The Requests page allows you to create, view, and manage all leave requests in your workspace.
Employees can submit time-off requests, while HR and Admins can review, approve, or reject them all from a unified dashboard.

From this page, you can:
- Submit a new leave request
- View your own requests under My requests
- Review your team’s requests under Others requests (for HR/Admin)
- Filter requests by status, type, or year
- Download your request data as a report
The table updates automatically as requests are added or approved, so you always have a real-time view.
Interface Layout
| Section | Description |
|---|---|
| Search Bar | Quickly search for requests by employee name, date, or reason. |
| Filters | Use dropdowns to filter by Status, Type, or Year. |
| Tabs | Switch between My Requests and Others Requests. |
| New Request Button | Opens the form to submit a new leave request. |
| Export Icon | Download your leave request data in Excel format. |
| Table Columns | Displays request details such as Member, Leave Type, Date Range, Duration, and Status. |
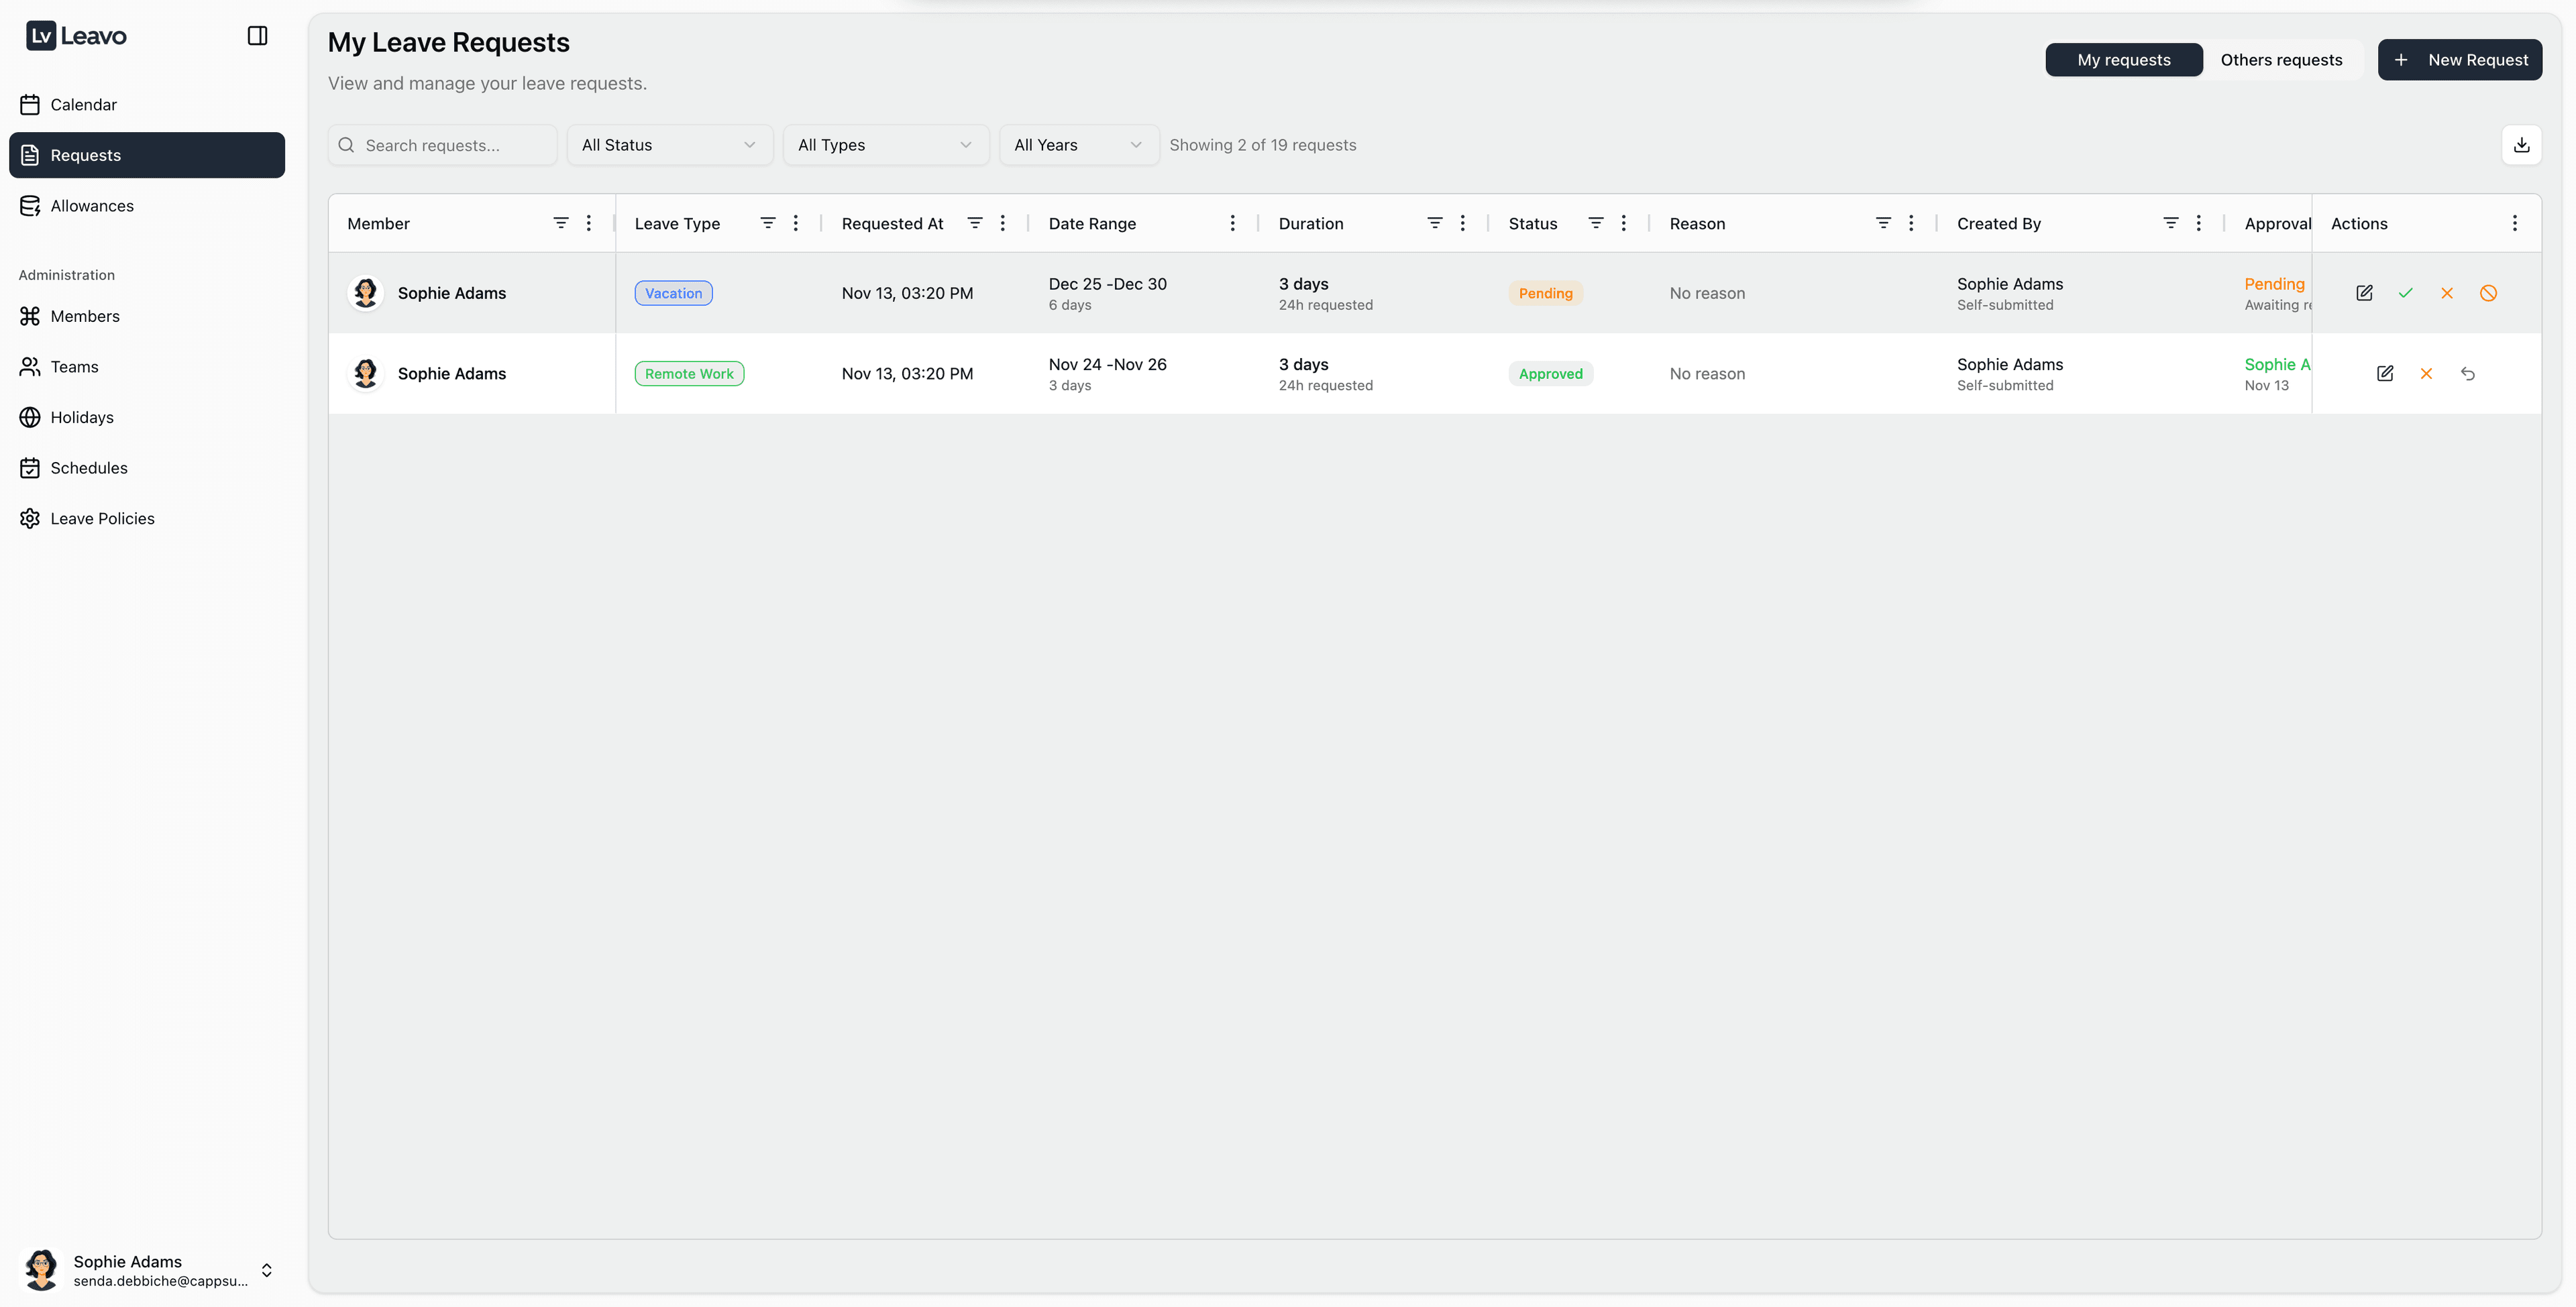
My Requests
The My Requests tab lists all the leaves you’ve personally submitted.
Each row represents one leave request and includes the following details:
| Column | Description |
|---|---|
| Member | Your name (auto-filled). |
| Leave Type | The type of leave (Annual, Sick, Remote, etc.). |
| Requested At | The date you created the request. |
| Date Range | Start and end dates of the requested leave. |
| Duration | Total working days covered by the request. |
| Status | Current state: Pending, Approved, Rejected, or Canceled. |
| Reason | Optional explanation you provided. |
| Approved By | HR or Admin who handled the request. |
| Actions | Options to edit or undo. |
Others Requests
If you’re an HR or Admin, you’ll see an additional tab called Others Requests.
Here, you can manage all leave requests submitted by employees in your organization or assigned teams.
This view allows you to review, approve, edit, reject, or cancel requests directly.
| Action | Description |
|---|---|
| Edit | Allows Admins and HRs to modify an existing request (dates, leave type, description) before approval. Useful for corrections or policy adjustments. |
| Approve | Confirms the leave request. The status changes to Approved, and the leave appears on the Calendar while updating employee balances in real time. |
| Reject | Declines a pending request. You can add a rejection reason that will appear in the employee’s request details. |
| Cancel | Lets Admins cancel a pending request. The leave is removed from the Calendar, and allowances are restored automatically. |
Regular employees can only view the My Requests tab.
The Others Requests tab is visible exclusively to HR and Admin roles.
When editing or canceling a request, the employee automatically receives an email notification summarizing the change.
Cancelling an approved request will immediately revert used leave days back to the employee’s balance – make sure to confirm the change before saving.
Create a New Leave Request
Click New Request to open the submission form.

Fill in the following fields:
| Field | Description |
|---|---|
| Select Member | Defaults to your name. Admins can select another member if creating on their behalf. |
| Leave Type | Choose from predefined policies (Annual, Sick, Remote, etc.). |
| Date Range | Pick start and end dates using the date selector. |
| Description | Add a note for your manager (optional). |
As soon as you select a date range, the Request Summary panel on the right shows:
- Total days requested
- Breakdown by working hours
- Company holidays automatically excluded
Once all fields are complete, click Create Request.
If you made a mistake or need to cancel, click Cancel at the bottom of the form.
Edit an Existing Leave Request
You can edit a request from both My Requests and Others Requests (for HR/Admin/Approver).
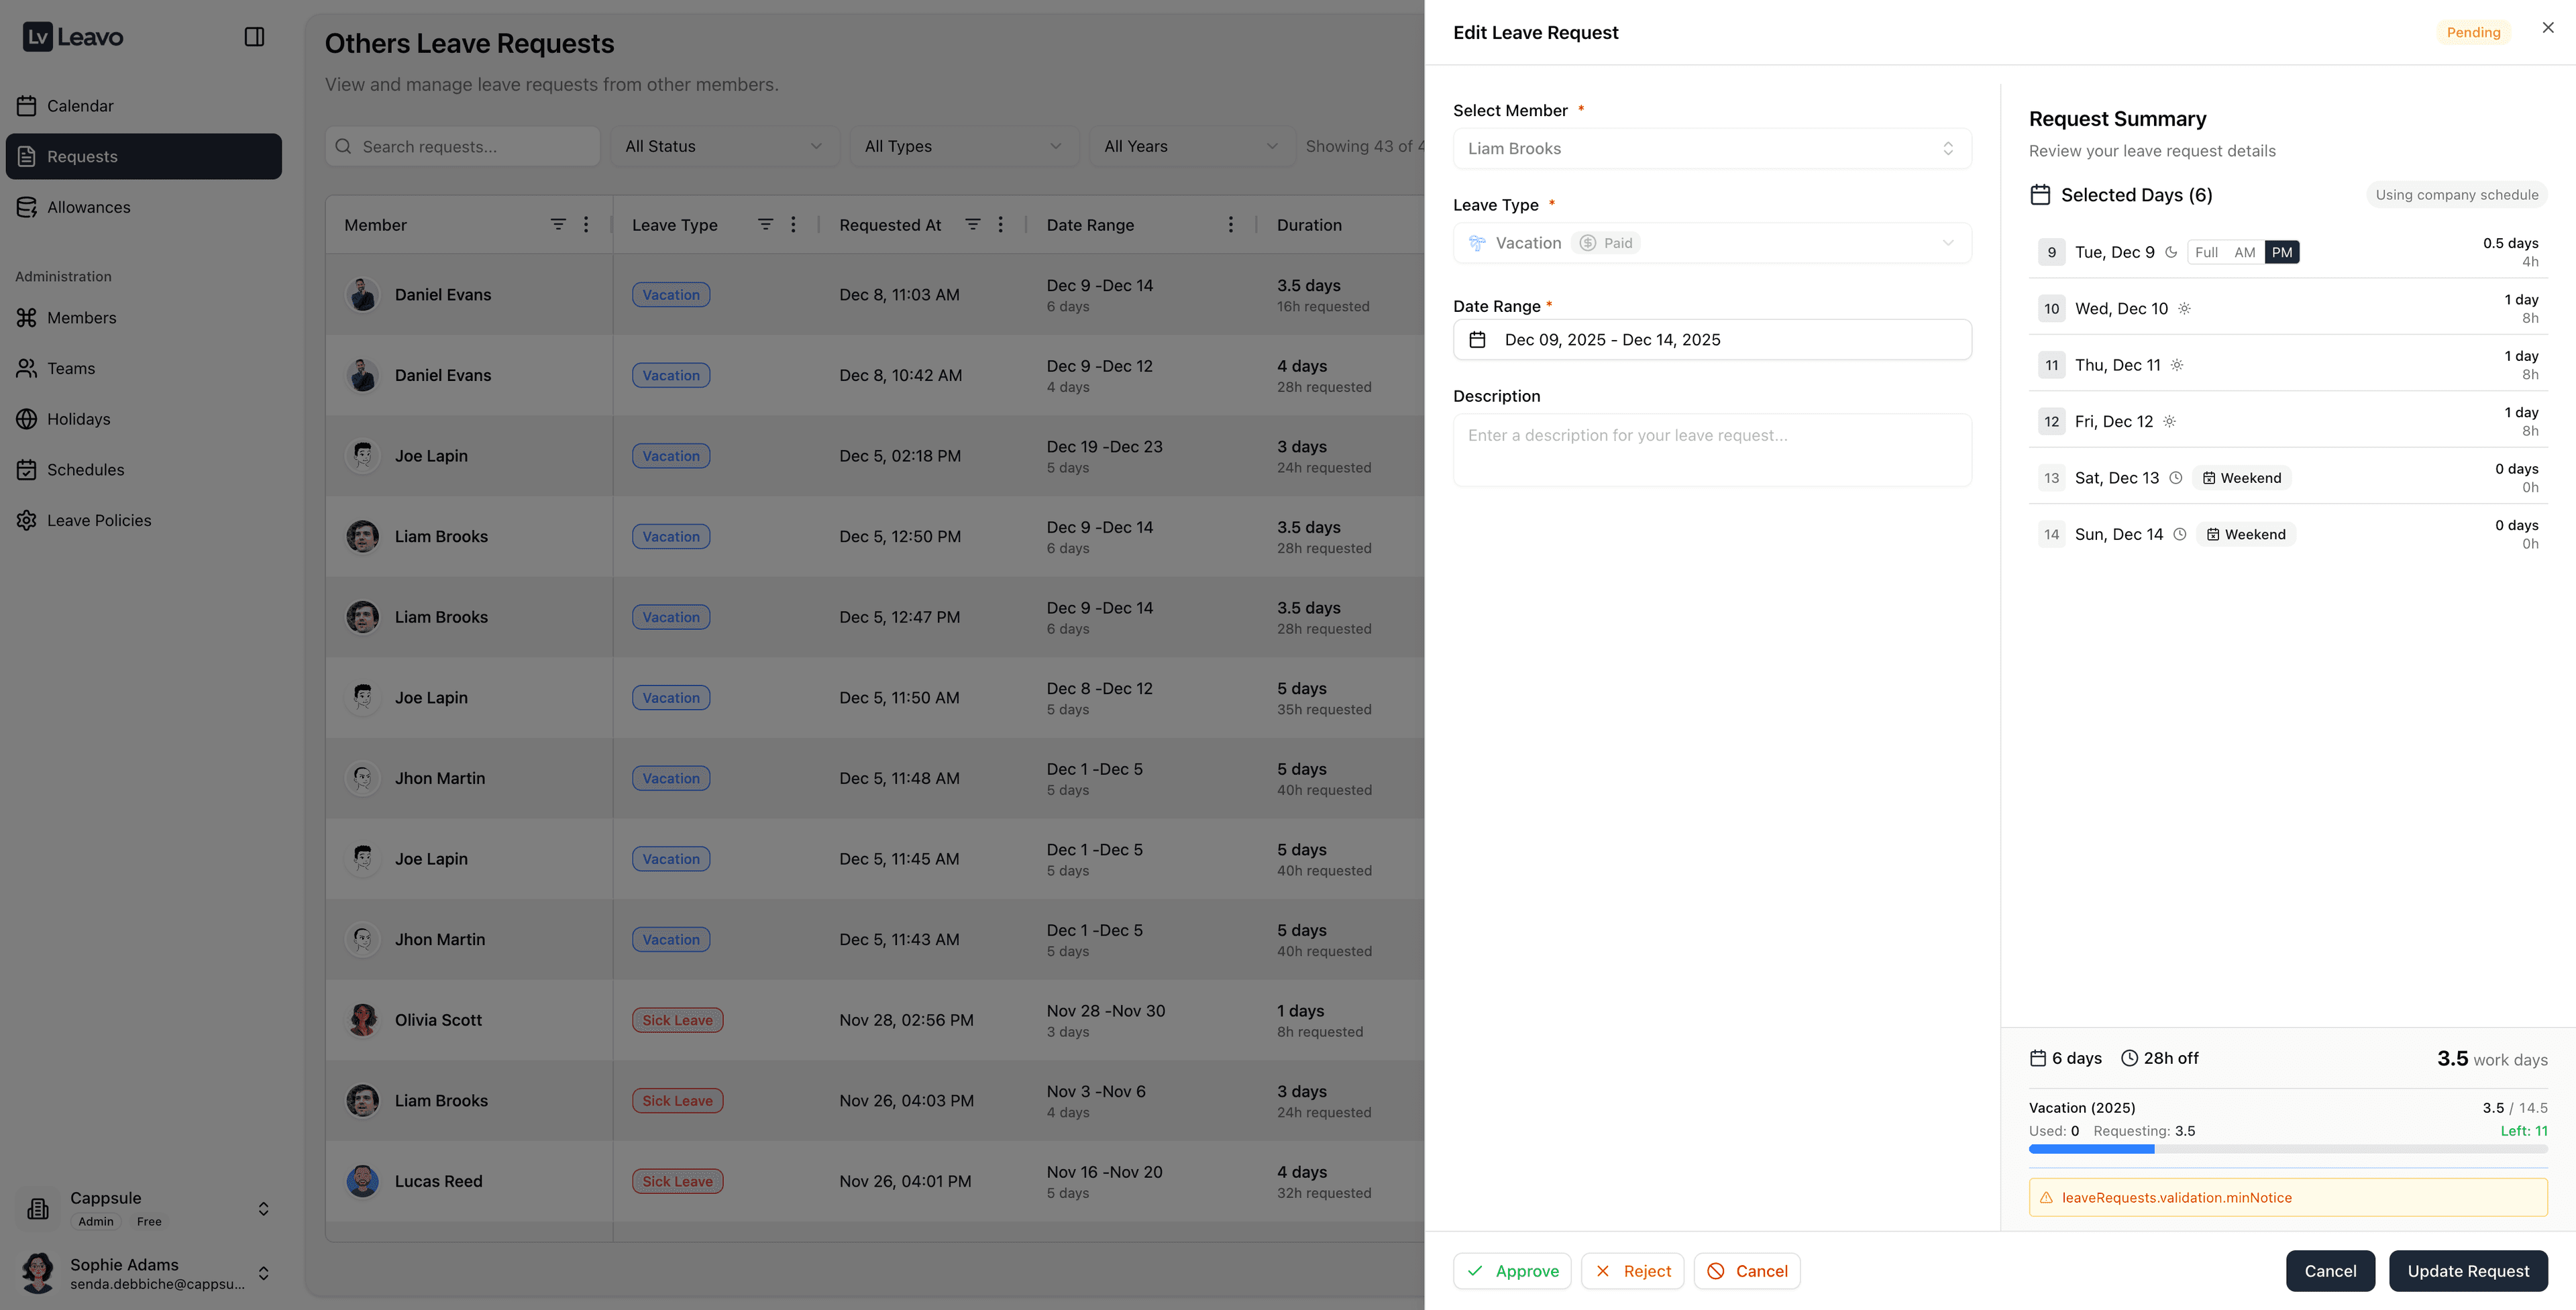
How to edit
- Open the Requests page.
- In the table, click the Edit () action for the request you want to modify.
- The same form layout used for creation appears on the right side, with:
- Select Member
- Leave Type
- Date Range
- Description
- Request Summary panel
You can adjust:
- The date range (start and end dates)
- The description _ The Attachements
All real-time validations (overlaps, minimum notice, maximum consecutive days, allowances, non-working days, etc.) are re-applied when you edit a request.
If the new configuration violates a company rule, you won’t be able to save until the issue is resolved.
After your changes:
- Click Update Request to save.
- The updated request immediately refreshes in the table, Calendar, and Allowances (if applicable).
- The concerned employee receives an email notification describing what changed.
Requests with Attachments
Some leave types, such as Sick Leave, can be configured to require an attachment (medical certificate, proof document, etc.) from the Leave Types page.
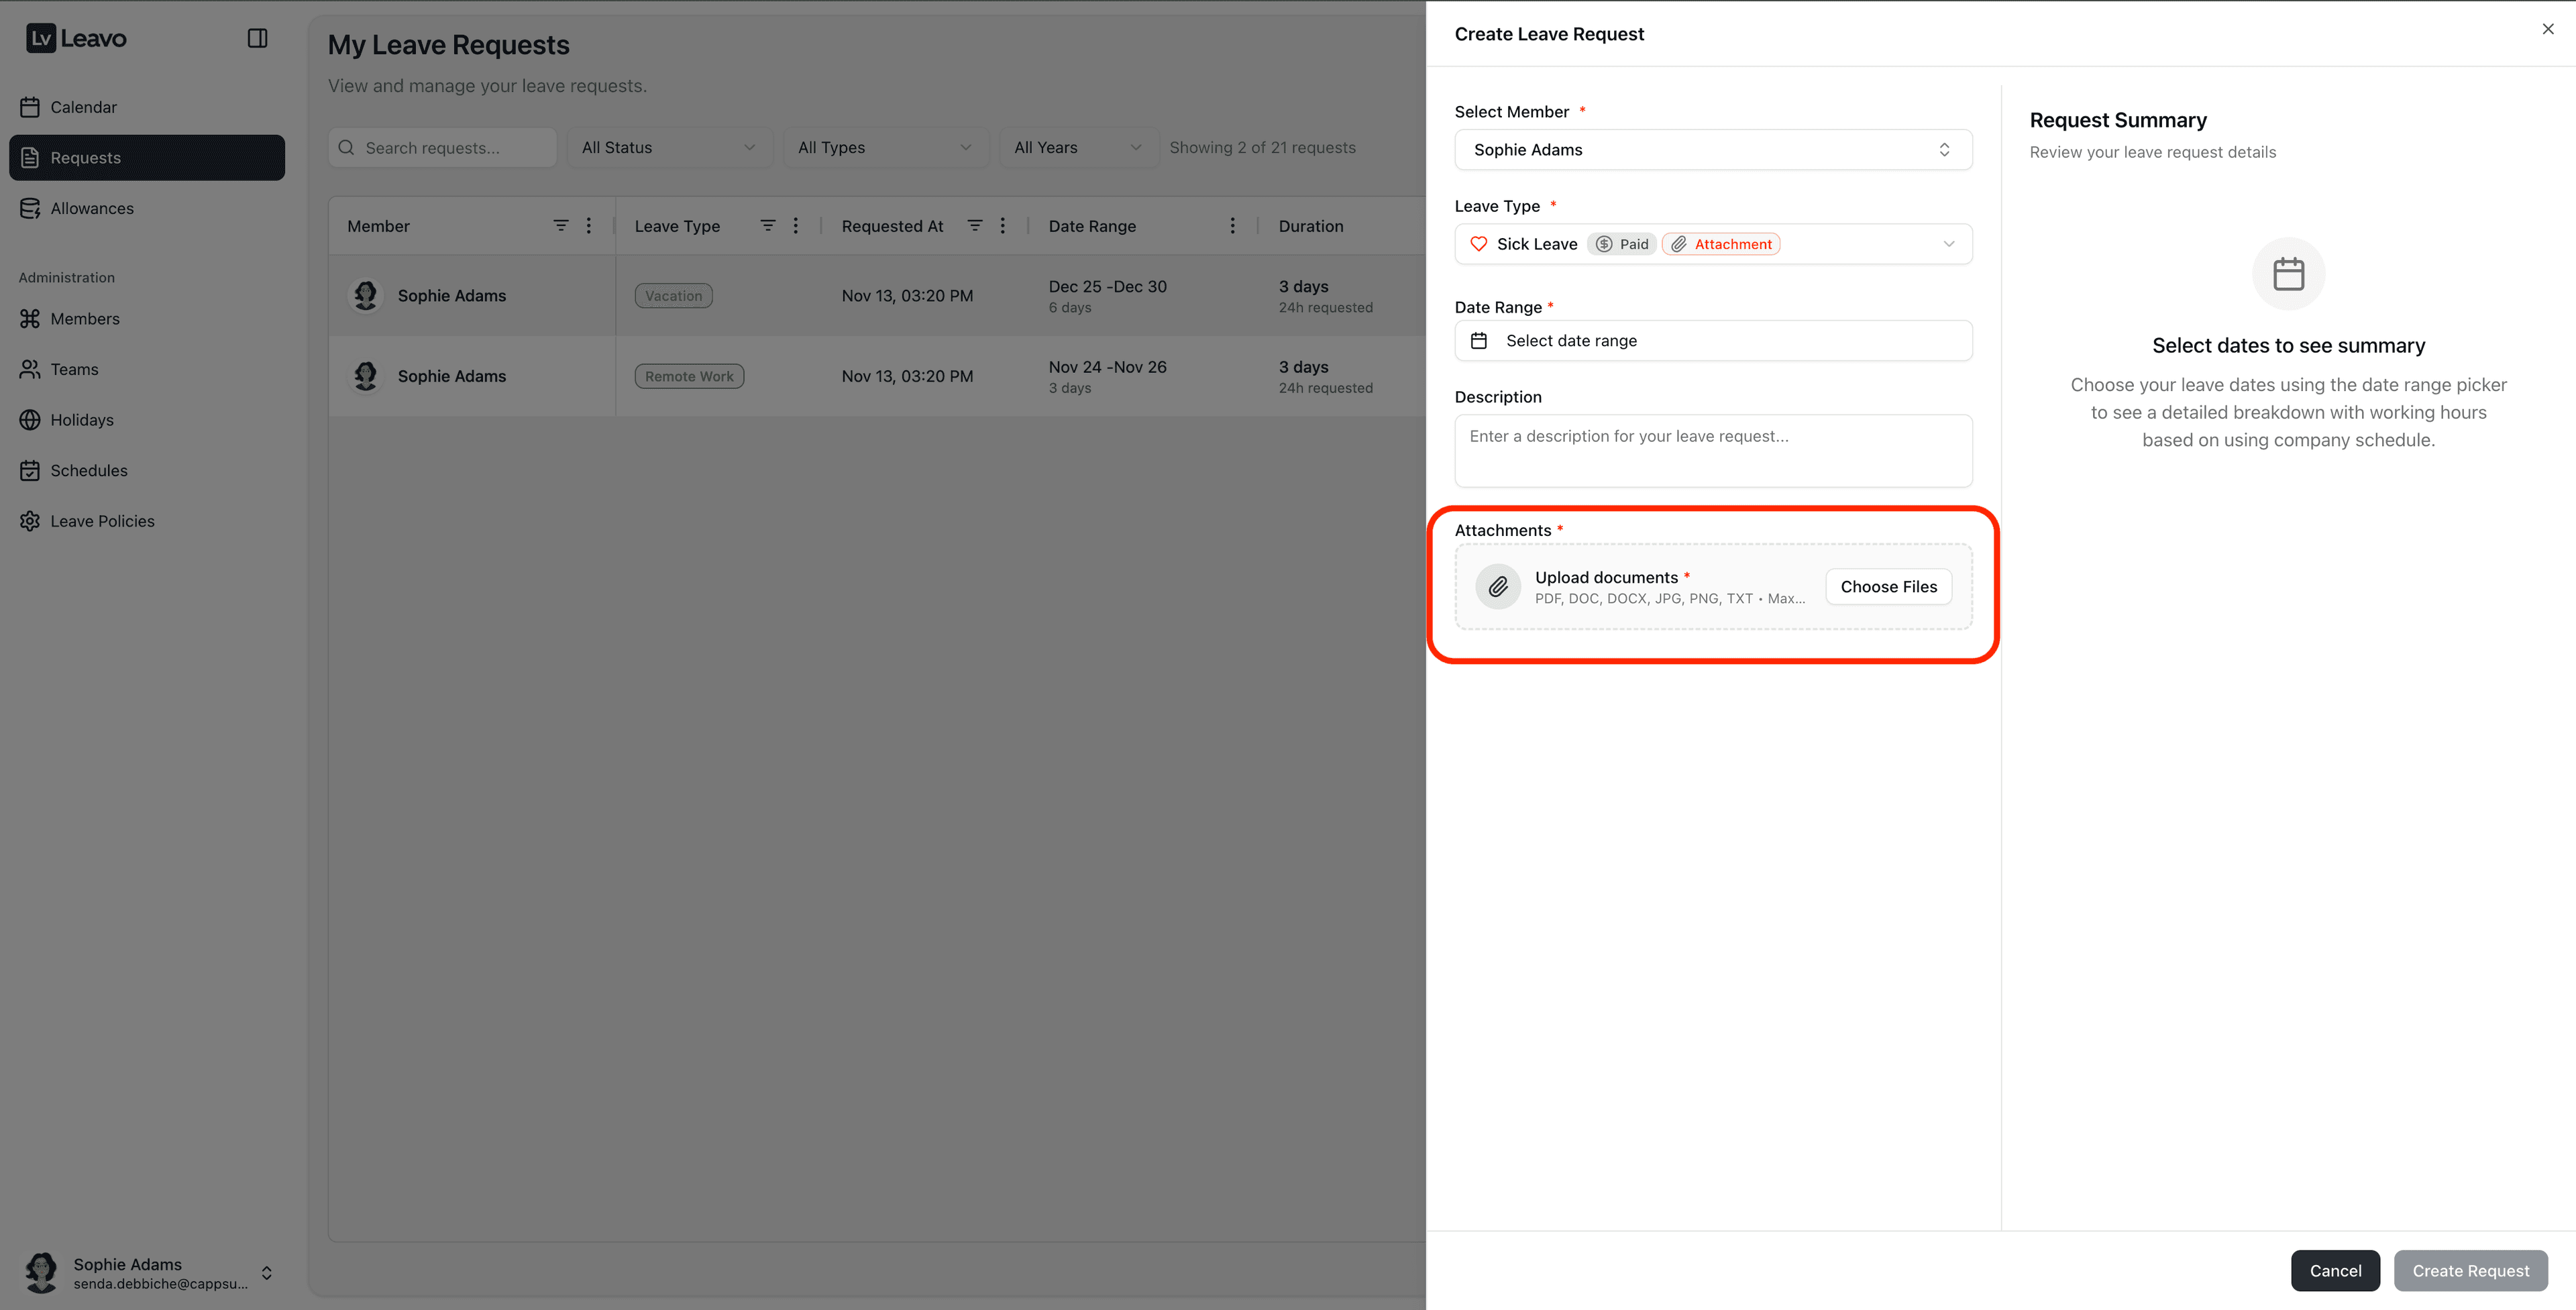
When you select a leave type that requires documents, the Attachments field becomes mandatory.
How it works
- If the leave type is marked Attachment Required:
- You must upload at least one file before submitting the request.
- The Create Request button remains disabled or will show a validation error if no document is attached.
- If the leave type has Optional attachments:
- You can still upload supporting files (for context), but it’s not mandatory.
Supported formats
You can upload:
- DOC / DOCX
- JPG / PNG
- (or any allowed formats indicated below the upload area)
What approvers see
For HR/Admin reviewing the request:
- Attachments appear in the Request details panel.
- They can open or download the files before approving, rejecting, or canceling the request.
- If the leave type is configured with required attachments, approvers can be confident that a document is always stored with the request.
Attachments are securely stored and linked to the request. If the request is canceled or rejected, the attachment remains available in the request history for audit purposes.
Request Summary Panel
The Request Summary panel on the right provides a complete breakdown of all selected days and how they are counted.
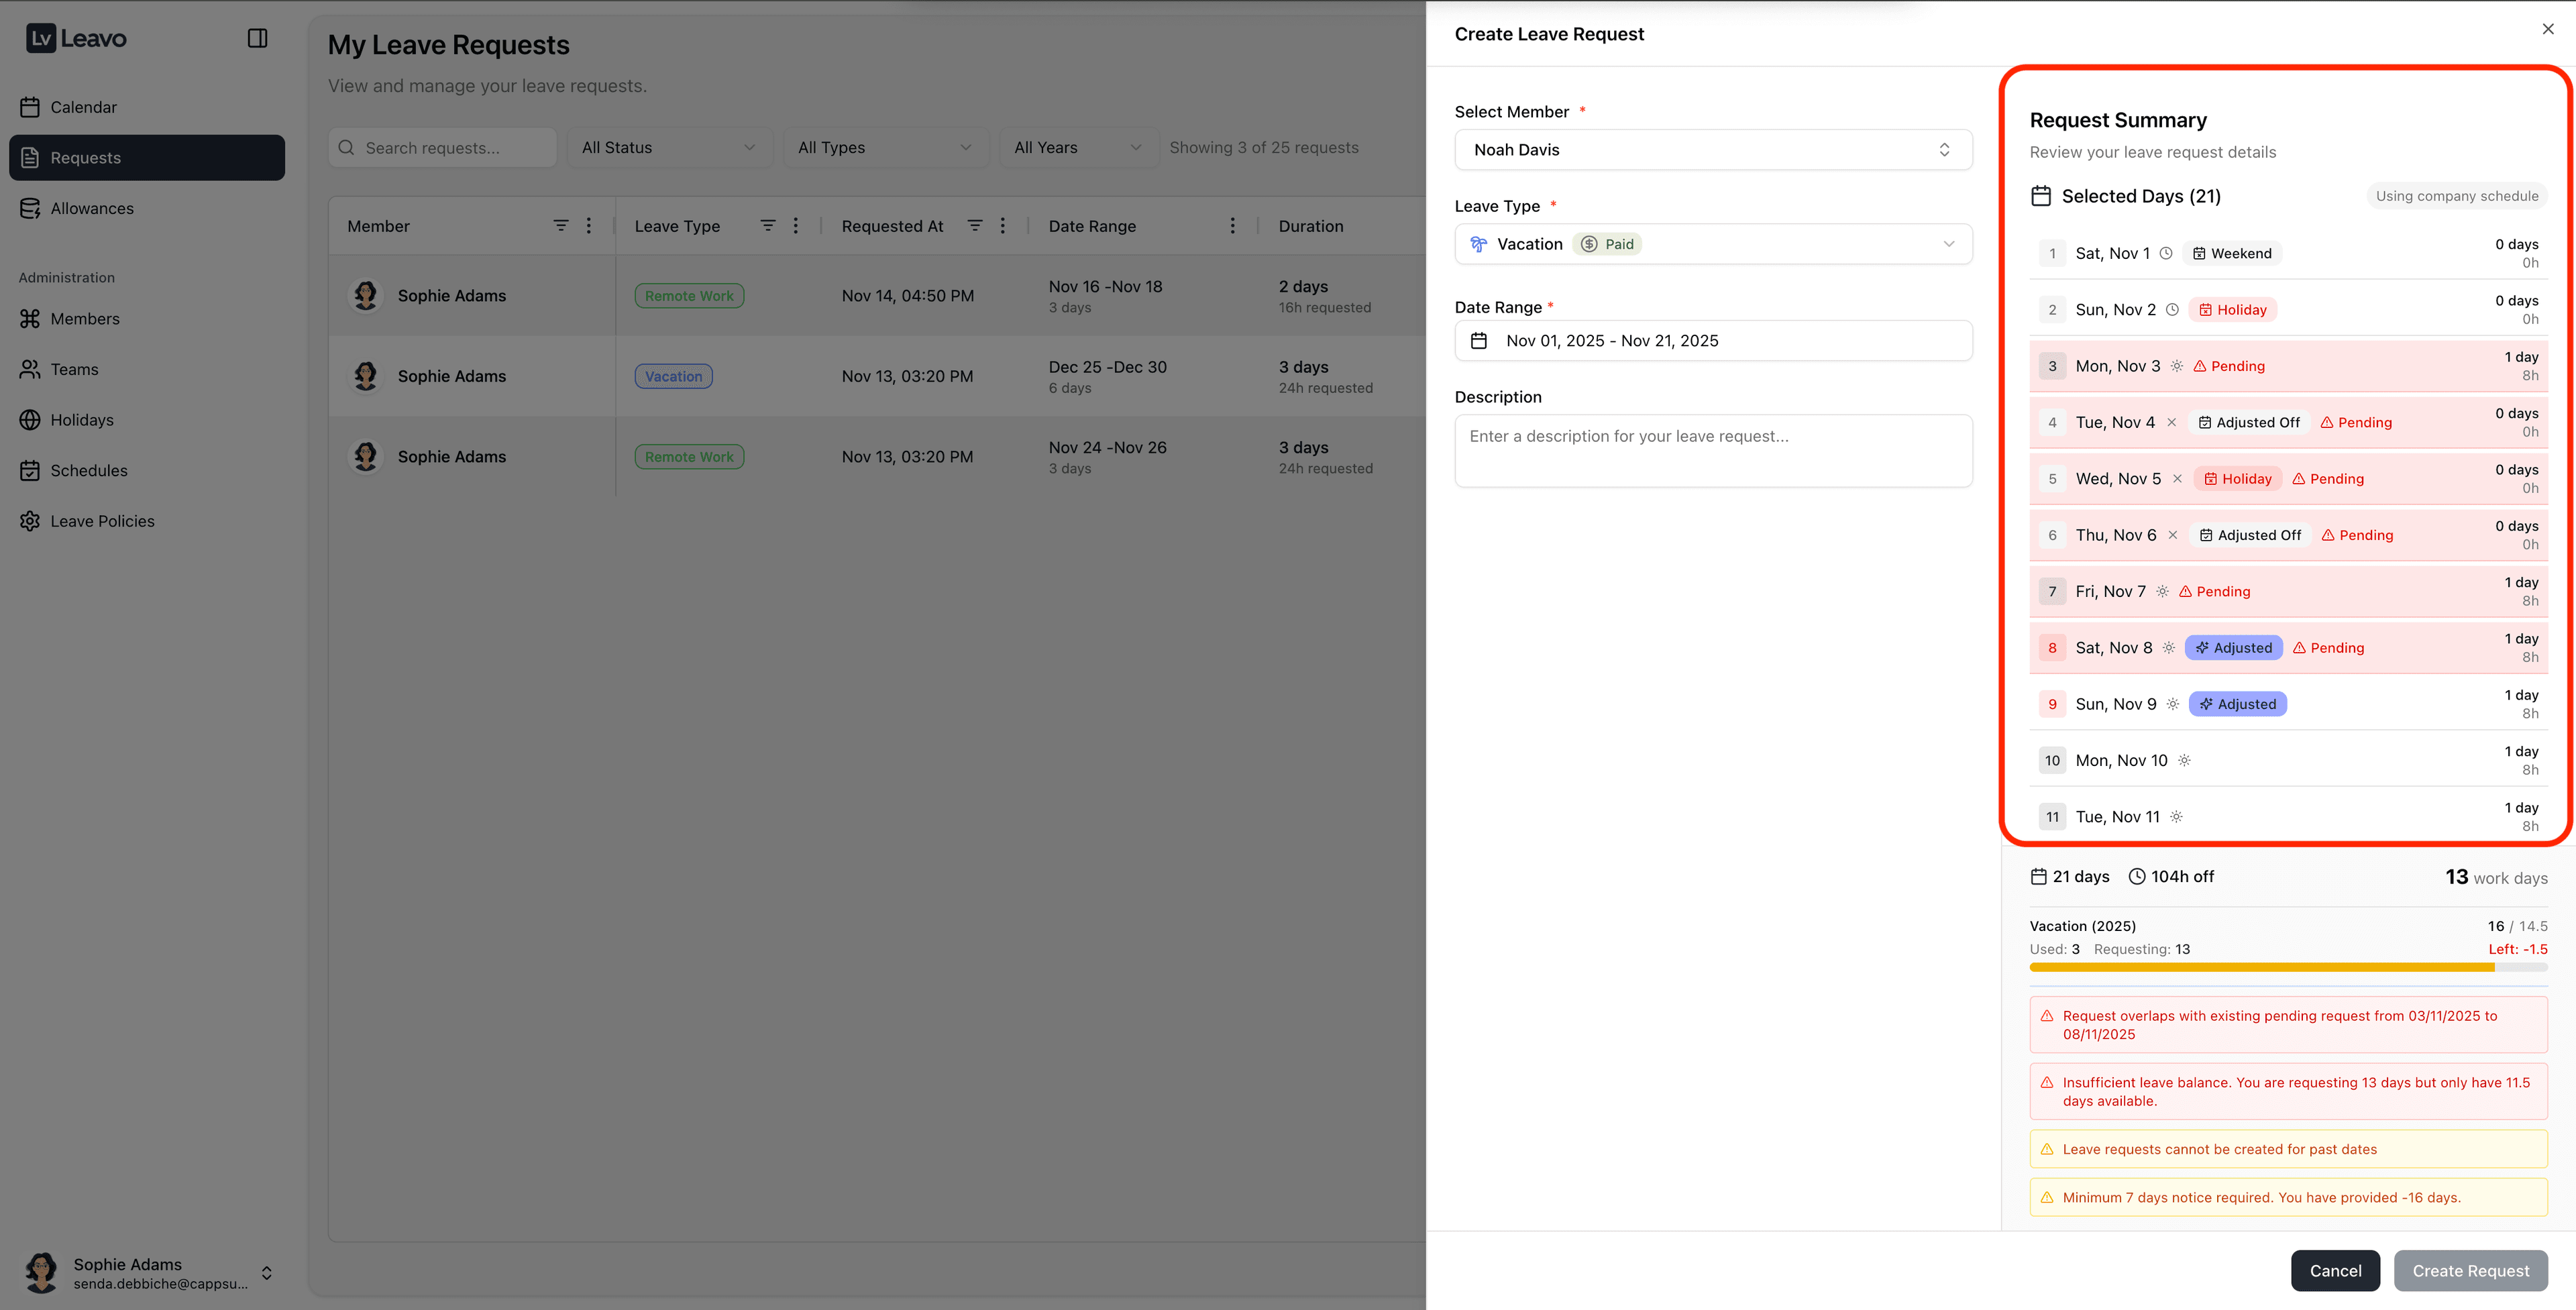
🔹 Daily Breakdown
For each date, the system shows:
- Working day / holiday / weekend
- Pending or existing leave conflicts
- Adjusted days (if schedule exceptions exist)
- Number of hours counted for that day (8h)
- Whether it counts as a full day, half-day, or is ignored due to holidays
Each line shows icons explaining the status, such as:
- Holiday
- Weekend
- Pending / conflict
- Adjusted working day
This gives both employees and approvers full transparency on how each day is treated.
🔹 Totals Overview
At the bottom of the panel, you can see:
- Total calendar days
- Total working days
- Total working hours
- Updated balance after request
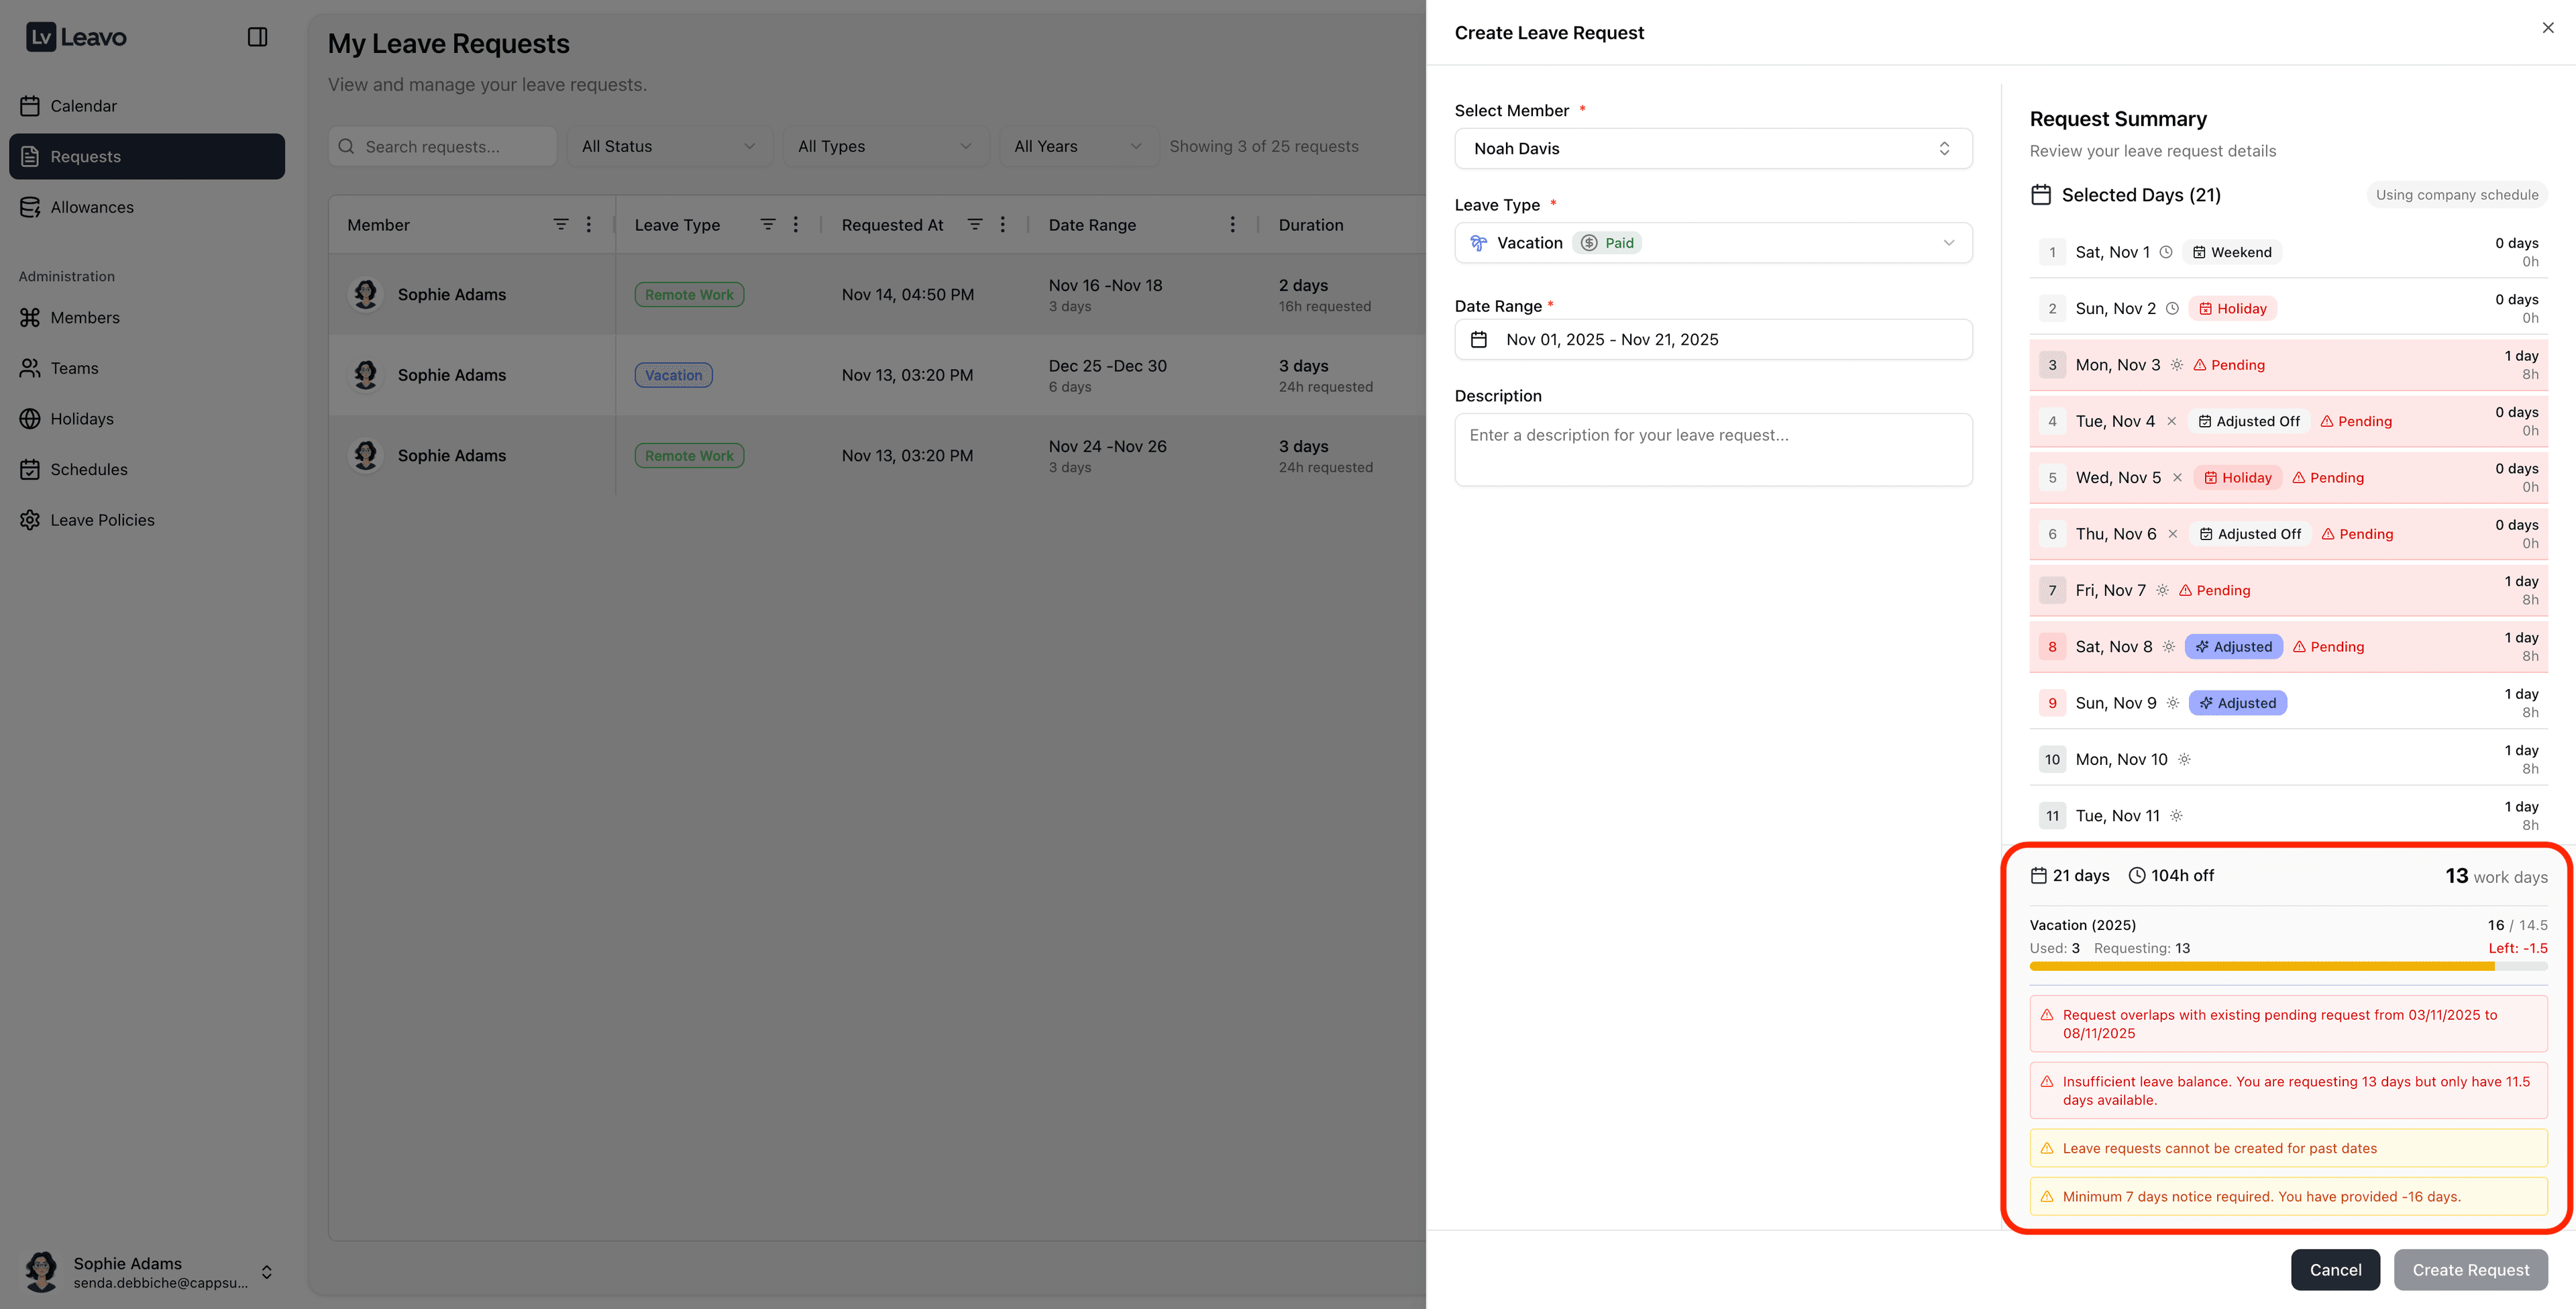
Example:
21 days → 104h off → 13 work days
Used: 3—Requesting: 13—Left: -1.5
All calculations respect:
- Part-time prorated schedules
- Custom schedules
- Holiday calendars
- Adjusted workdays
🔹 Why Request Summary Matters
This section gives HR and employees full transparency:
- How the system counted each day
- Why certain days are ignored
- Why a request may be blocked
- How much balance will remain
It ensures accuracy, consistency, and fairness across your organization.
Real-Time Balance & Validation Rules
When creating or editing a request, the system continuously checks all company rules and the employee’s allowance in real time.
As soon as you select or change dates, the bottom of the panel displays warnings, restrictions, and updated balances.
This ensures employees submit valid requests and prevents policy violations before they happen.
🔍 What is validated?
Your workspace validates several conditions simultaneously:
1️⃣ Past Dates Restrictions
- Regular employees cannot create requests in the past.
- Only Admins and HR are allowed to submit past leave.
Example:
If an employee selects a date before today → a yellow warning will appear, and they cannot submit the request.
2️⃣ Overlapping Requests
The system prevents employees from creating two requests that cover the same days.
- If the selected date range overlaps with an existing pending or approved request, you will see a red overlap warning.
- The request cannot be submitted until you adjust the dates.
This ensures clean reporting and prevents duplicated leave.
3️⃣ Minimum Notice Rules
If your company policy requires a minimum notice period (7 days), the system will:
- Compare the selected start date with today
- Display a warning like:
“Minimum 7 days notice required. You have provided -16 days.”
Employees cannot submit if notice requirements are not respected unless they are Admin/HR.
4️⃣ Maximum Consecutive Days Allowed
If your leave policy limits how many consecutive days can be taken at once (ex: max 3 days for Sick Leave):
- The system checks the selected period.
- If exceeded, a red validation message appears:
“Maximum 3 consecutive days allowed. You are requesting 4 days.”
Submission is blocked until the range is corrected.
5️⃣ Allowance Balance & Limits
The allowance bar updates live based on:
- Current balance
- Days already used
- Days being requested
- Carry-over
- Yearly entitlement
If the requested days exceed the remaining balance:
- A red warning appears, for example:
“Insufficient leave balance. You are requesting 13 days but only have 11.5 days available.” - The user cannot submit the request.
Admins may override this depending on company settings.
6️⃣ Requests Spanning Multiple Calendar Years
Leavo allows you to create a request that crosses the year boundary, for example from Dec 28, 2025 → Jan 5, 2026.
- The system automatically evaluates each day according to the schedule, holidays, and policies of its year.
- The working days in 2025 are deducted from the 2025 allowance; working days in 2026 are deducted from the 2026 allowance (when policies exist for both years).
- If there is no active policy for one of the years, you may see an insufficient balance warning and the request cannot be saved until the configuration is corrected.
You can also directly create a leave request fully in next year (a 2026 vacation booked from 2025) as long as the future policy and allowances are already configured.
7️⃣ Requests on Non-Working Days Only
Leavo respects each member’s work schedule and holiday set:
- Weekends, company holidays, and non-working days are automatically excluded from the working-day count.
- If the selected range contains only non-working days (for example, Saturday–Sunday when you don’t work weekends):
- The Request Summary will show 0 work days.
- You cannot submit the request, because there is no actual working time off to record.
Within a longer range that includes both working and non-working days:
- Non-working days are ignored for the allowance calculation,
but still displayed in the breakdown so you understand how the period is treated.
Approval Workflow & Undo
Leavo enforces a clear approval lifecycle to keep your data consistent and auditable.
Status lifecycle
A typical request moves through these stages:
- Pending → created by the employee.
- Approved → validated by an approver (HR/Admin).
- Optionally, Undo → moves the request back to Pending if a correction is needed.
- From Pending again, the approver can Approve, Reject, or Cancel.
Rules and limitations
- You cannot reject or cancel a request that is already in Approved status.
- To change an approved request, you must use Undo:
- The status goes back to Pending.
- The employee’s balance is updated (days are returned).
- The request can then be edited, approved again, rejected, or canceled according to your internal process.
- Undo keeps the full history and traceability of the request while allowing corrections when something was approved by mistake (wrong dates, wrong leave type, etc.).
Use Undo any time an approved request needs to be adjusted or re-evaluated. This avoids deleting historical data while keeping balances and calendars accurate.
Filtering Requests
Use the filter bar at the top to narrow down your view:
| Filter | Options |
|---|---|
| Status | All Status, Pending, Approved, Rejected, Canceled |
| Type | All Types or a specific leave type (Annual, Sick, etc.) |
| Year | Filter by year of the request or leave date |
Managing Requests
| Role | Available Actions |
|---|---|
| Employee (Default) | Create, view, and cancel personal requests. |
| HR | Approve or reject requests from their team. |
| Admin | Manage all requests across the organization. |
Every action (approve, reject, cancel) automatically updates the employee’s Calendar and Allowance balance.
✉️ Email Notifications
Leavo automatically sends email notifications so that everyone stays informed about request changes.
When a request is created
-
Approver notification
As soon as an employee submits a new request, the assigned approver (HR/Admin) receives an email such as:- Subject:
New leave request from Sophie Adams - Includes: Leave type, start date, end date, total days, reason, and a “View Request” button linking back to Leavo.
- Subject:
-
Employee confirmation
The requester receives a “Leave Request Submitted” email confirming that their request is pending approval, with the same key details and a “View Request” button.
When a request is approved or rejected
- If the approver approves the request, the employee receives a “Leave Request Approved” email summarizing:
- Leave type, dates, total days, and the approver’s name.
- If the approver rejects the request, the employee receives a “Leave Request Rejected” email, including:
- The approver’s rejection reason (if provided) and a link to review the request details in Leavo.
When a request is canceled or modified
-
If an approver or admin cancels an existing pending request, the employee gets a “Leave Request Canceled” email:
- It confirms that their balance has been restored and shows the original request details.
-
If a request is edited (for example, changing dates from Nov 10–14 to Nov 10–12), the employee receives a “Leave Request Modified” email clearly showing:
- A “What changed” section with old vs new dates and total days.
- A “Current details” section summarizing the updated request.
All these notifications are automated and sent from Leavo’s system email address.
Employees can always click “View Request” to open the request directly in the app and see its latest status.
Troubleshooting
| Issue | Solution |
|---|---|
| Can’t create request | Ensure your Leave Policy is assigned and you have enough balance. |
| Leave overlaps with another | Check the Calendar for conflicting dates. |
| Request not visible | Adjust filters or confirm the correct year is selected. |
After submitting a request, it appears instantly in the My Requests table with the status Pending.
Once reviewed, you’ll receive a notification when it’s Approved or Rejected.
Approved requests automatically sync with the Calendar and update your Allowances balance.