Manage your organization’s members, roles, policies, and work settings in one central place.
The Members page allows administrators to:
- Create and invite new employees
- Import members in bulk via CSV
- Edit or suspend existing members
- Configure approvers and leave policies
- Assign schedules and holiday calendars
- Export member data for audits or payroll
Only Admins and HR roles have permission to add, edit, suspend, or import members.
Employees can view only their own profile and cannot see or manage other members.
The Workspace Owner (Company Owner) is a special role automatically created when the workspace is set up.
The owner is always an Admin and has full administrative and billing permissions.
- HR roles do not have access to Billing or subscription settings
- Employees have no administrative privileges
You cannot change or transfer the Workspace Owner from the Members page.
If you need to update the owner (for example: departure, role change, new responsible person),
please contact Leavo Support owner transfers must be performed manually to ensure workspace security.
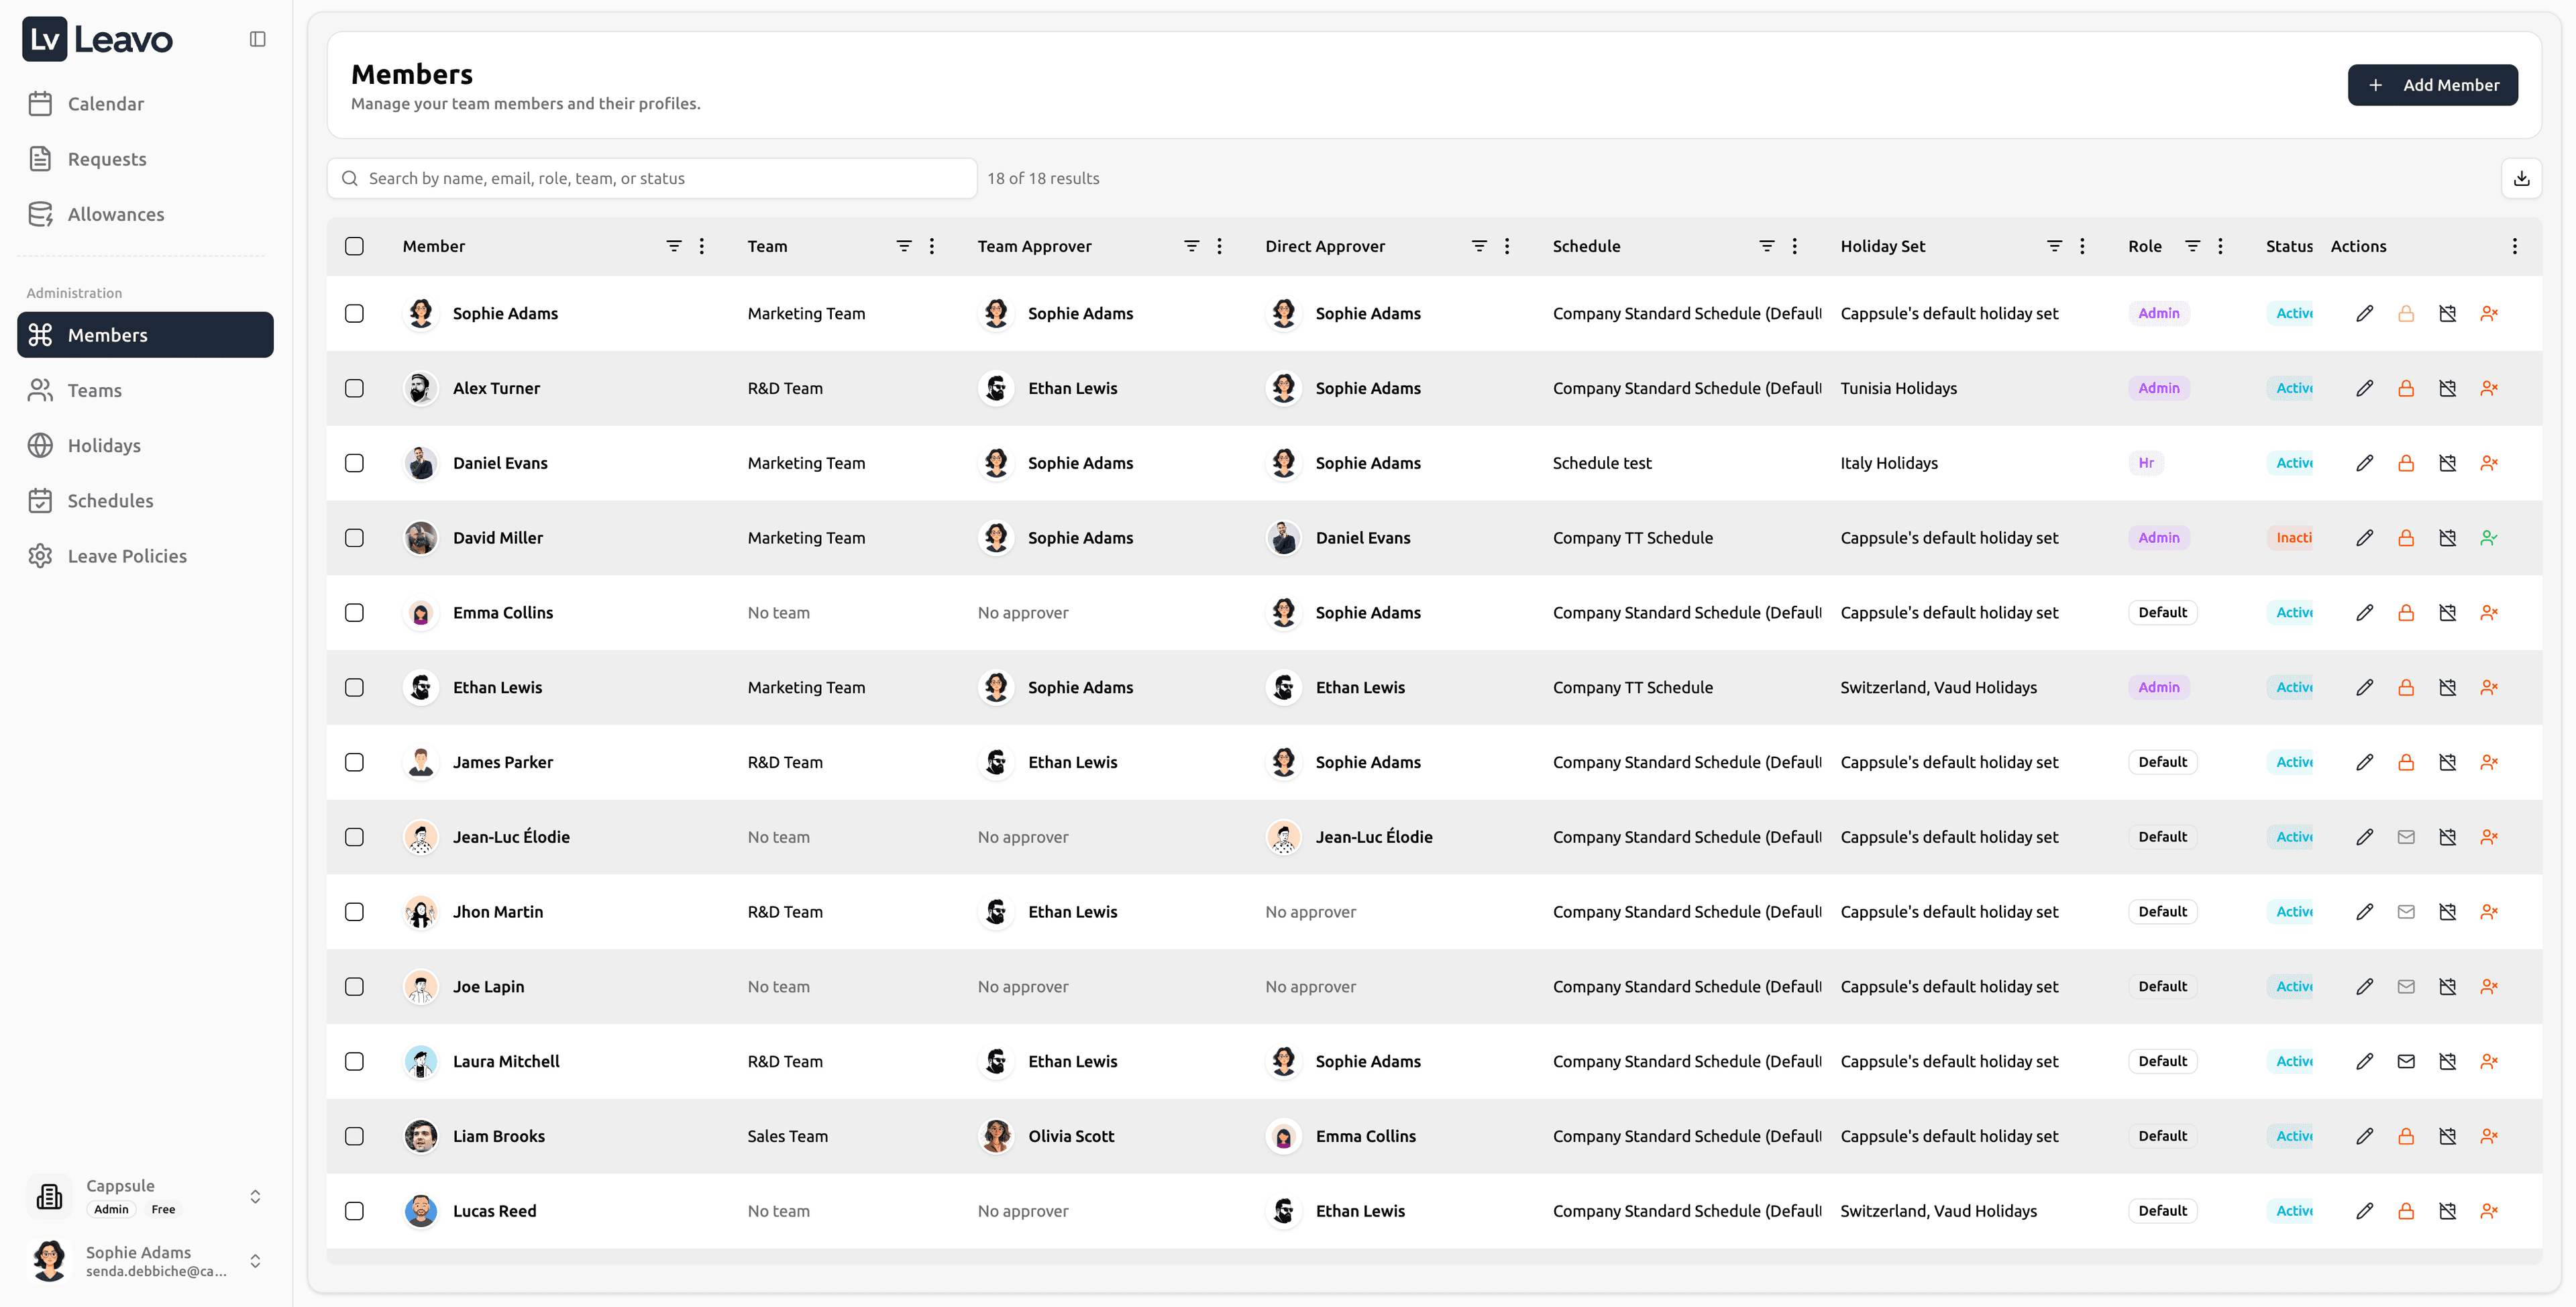
Main Table
Each row represents a member record with all relevant details.
| Column | Description |
|---|---|
| Member | Displays full name, avatar, and email address |
| Team | The team the member belongs to (or “No team”) |
| Team Approver / Direct Approver | Users responsible for validating leave requests |
| Schedule | Work schedule (Company Default or custom) |
| Holiday Set | Assigned holiday calendar used for leave calculations |
| Role | The user’s role (Admin, HR, or Default) |
| Status | Current employment status Active or Suspended |
| Access | Displays the member’s login access state, Granted, Revoked, or Pending |
| Invitation | Indicates whether the user has accepted their invitation, Joined, Pending, or Expired |
| Actions | Quick controls to Edit, Deny Access, Adjust Schedule, or Suspend Member |
The Access and Invitation columns make it easier to track onboarding progress:
- Access = Granted → The member can log in.
- Access = Revoked → The account exists but login is disabled.
- Invitation = Joined → The user accepted their invite and is active.
- Invitation = Pending → Invite sent but not yet accepted.
- Invitation = Expired → The invitation link is no longer valid (after 72h).
You can filter or sort by Access and Invitation to identify:
- Members who haven’t activated their accounts
- Users with revoked credentials
- Fully onboarded staff
Bulk Assign Schedule & Holidays
When you select one or more members in the list, a new button appears in the top-right corner labeled:
Bulk Assign
This feature allows administrators to apply work schedules and/or holiday calendars to multiple users at once.
How to use:
-
Select one or several members using the checkboxes in the table.
-
Click Bulk Assign in the top-right corner.
-
The “Bulk Assign Schedule & Holidays” panel opens on the right.
-
Choose:
- Work Schedule → Company Default, Part-Time, or Full-Time
- Holiday Calendar → Default Tunisia, Default France
-
Review the schedule details (Working Days, Weekly Hours, Timezone).
-
Click Assign to Members to confirm.
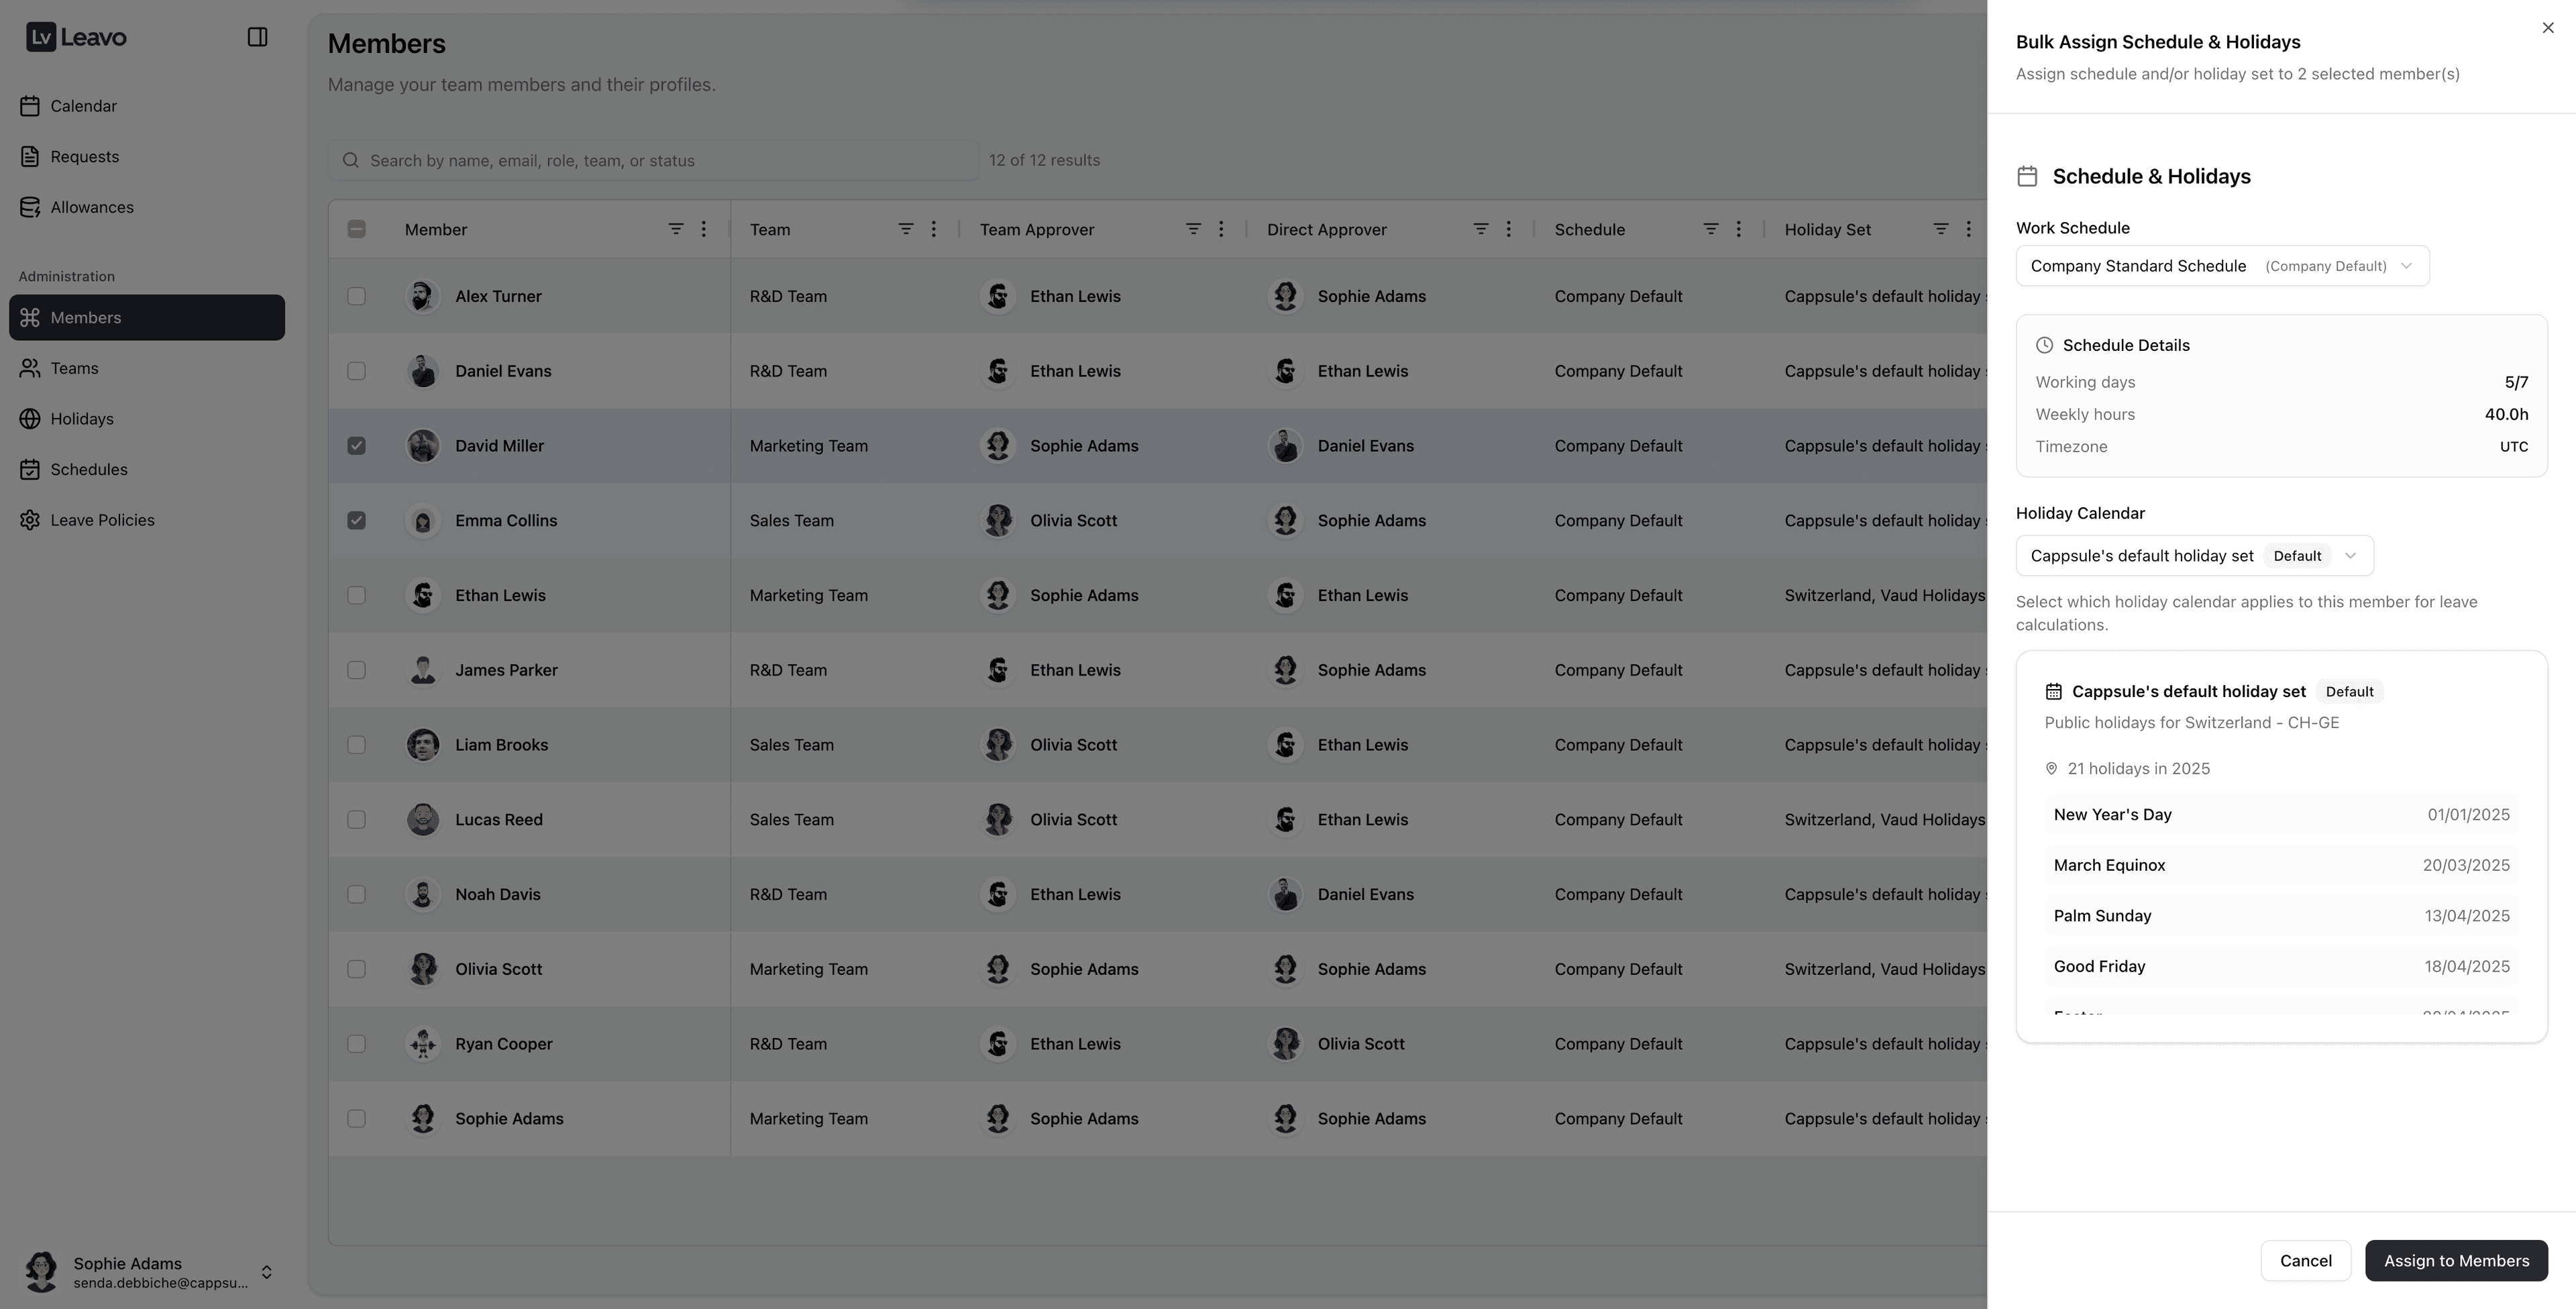
| Field | Description |
|---|---|
| Work Schedule | Choose the company’s default or a custom schedule |
| Schedule Details | Displays weekly working hours, working days, and timezone |
| Holiday Calendar | Select a regional holiday set for leave calculations |
- Bulk Assign is perfect for onboarding new teams or updating all employees when company-wide schedule changes occur.
Bulk assignment overwrites existing schedules and holiday calendars for selected members.
Changes take effect immediately and may impact leave balance calculations.
Always review settings before confirming.
Exporting Member Data
Click the Export button in the top-right corner to download a .csv or .xlsx file.
Exports include all visible columns and can be used for:
- HR reports
- Payroll reconciliation
- Policy audits
Export respects active filters only the currently visible list will be downloaded.
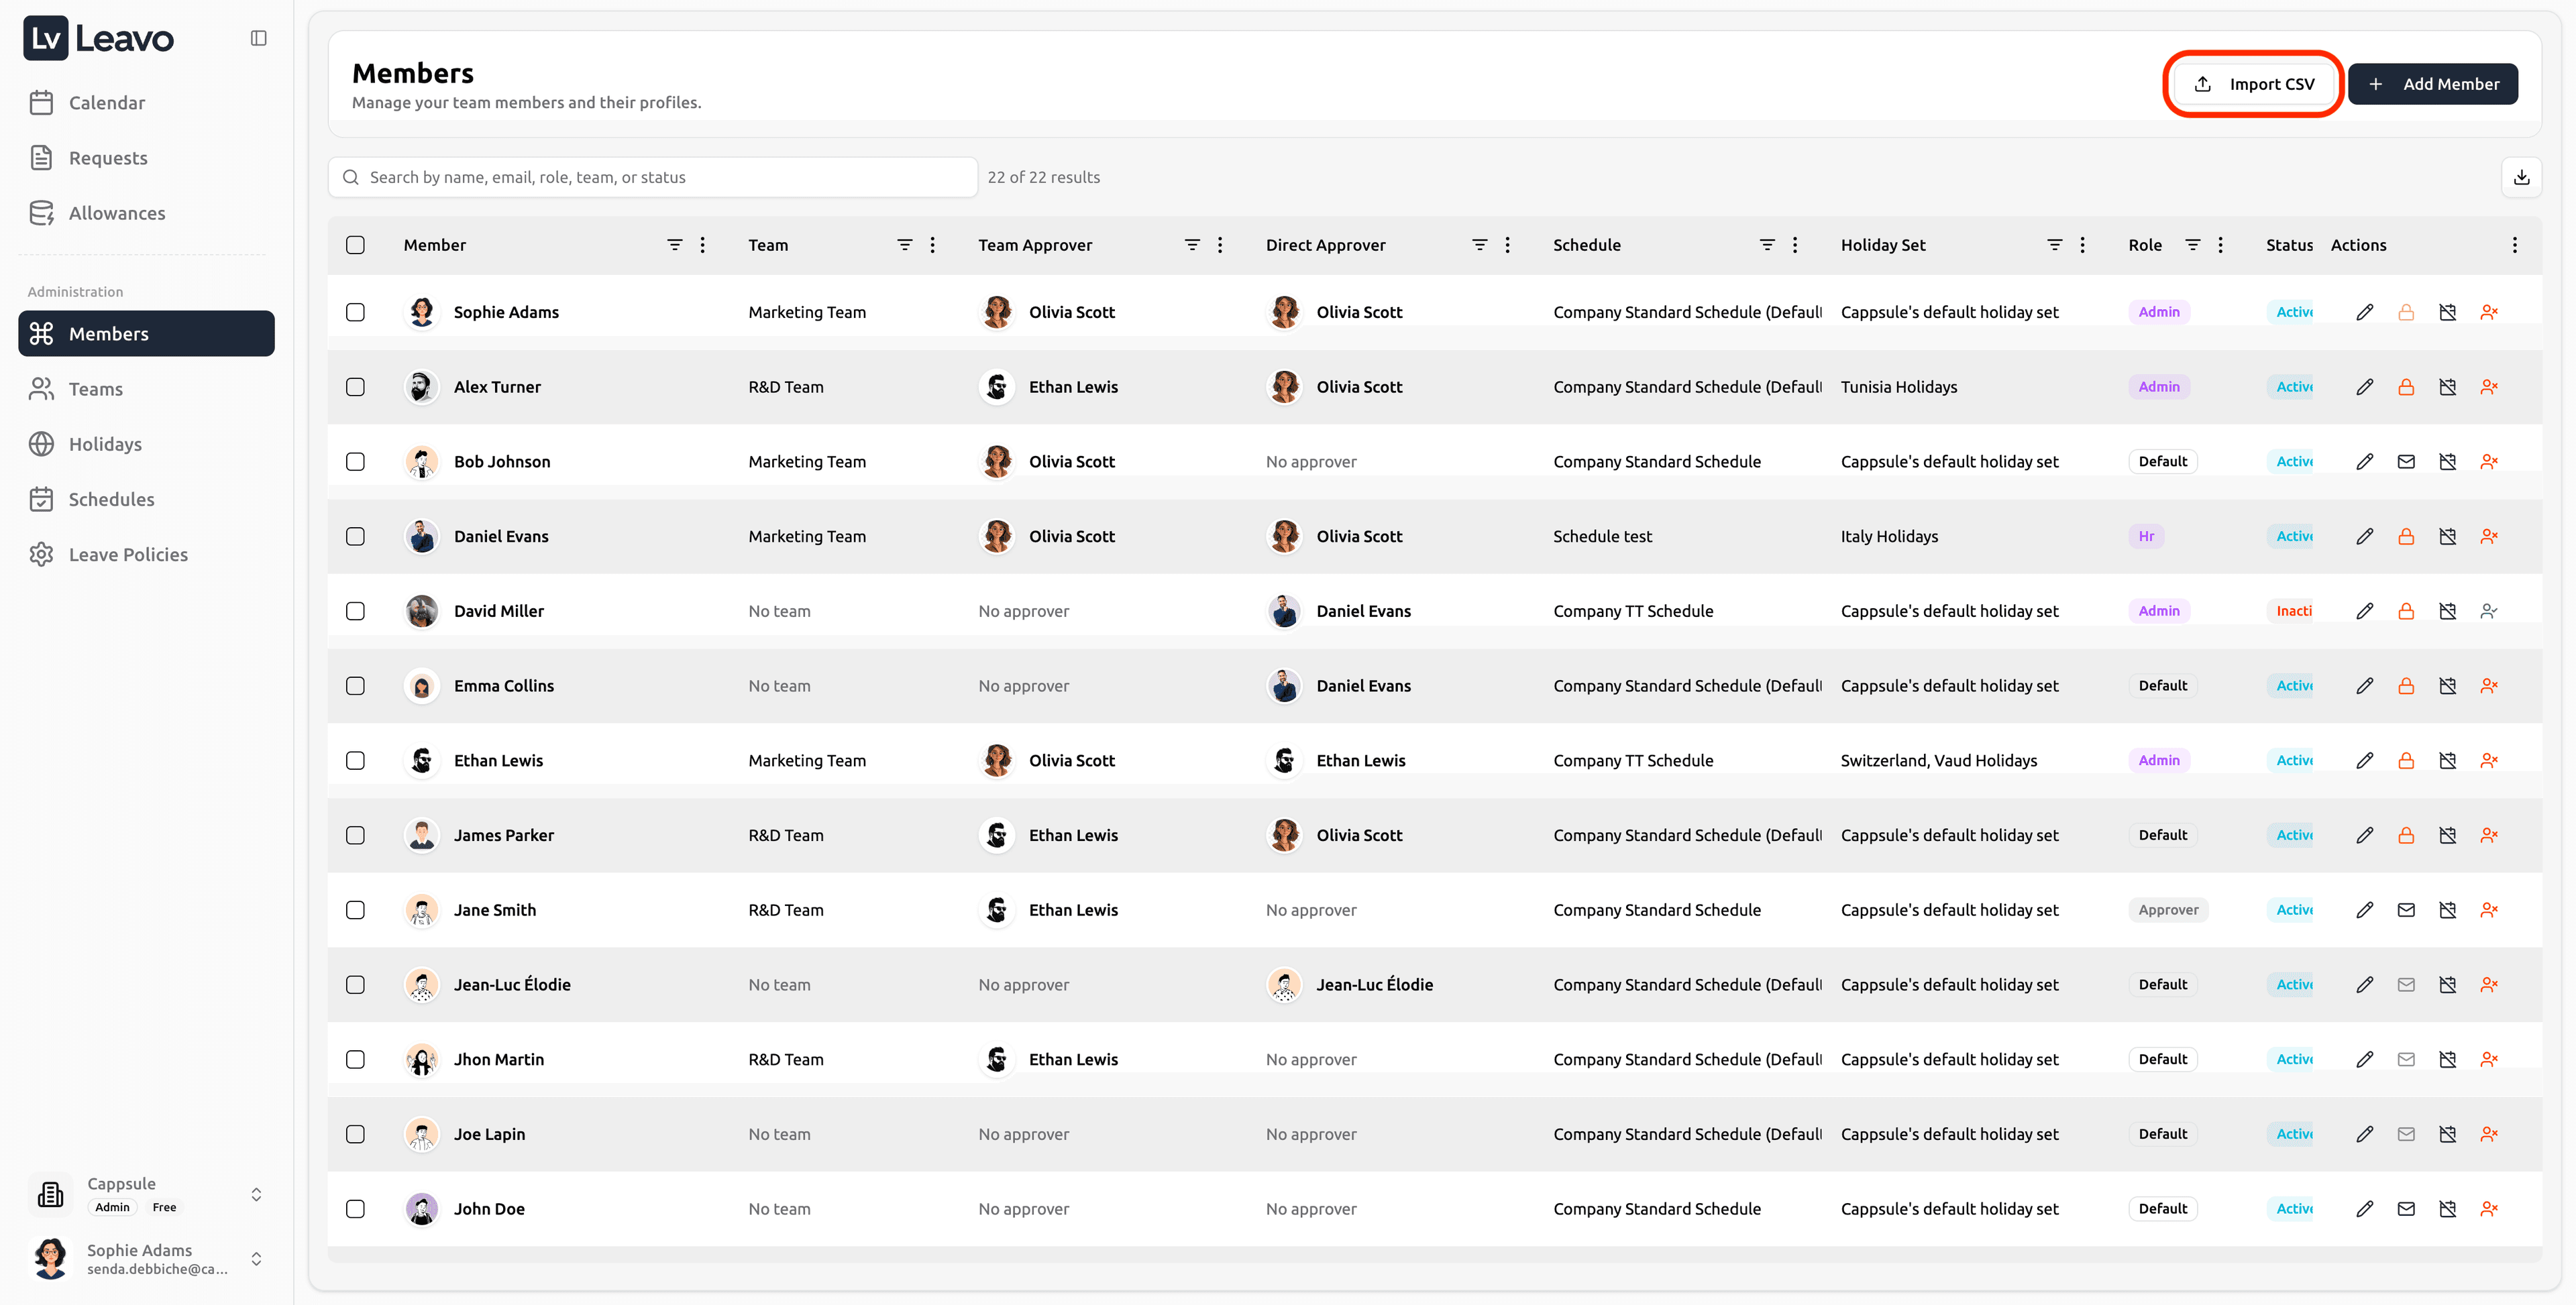
Import Members via CSV
Instead of adding members one by one, Admins and HRs can import a CSV file to create multiple members in a single workflow.
With Import CSV, you can:
- Download a ready-made CSV template
- Upload your file and instantly load member data
- Map CSV columns to Leavo fields
- Preview records and automatically detect errors
- Fix issues inline or skip invalid rows
- Assign teams, schedules, holiday sets, and leave policies in one step
- See imported members immediately in the Members list
CSV import is available only to Admins and HR roles.
Step 1 — Download Template or Upload Your CSV
Click Import CSV in the top-right corner of the Members page.
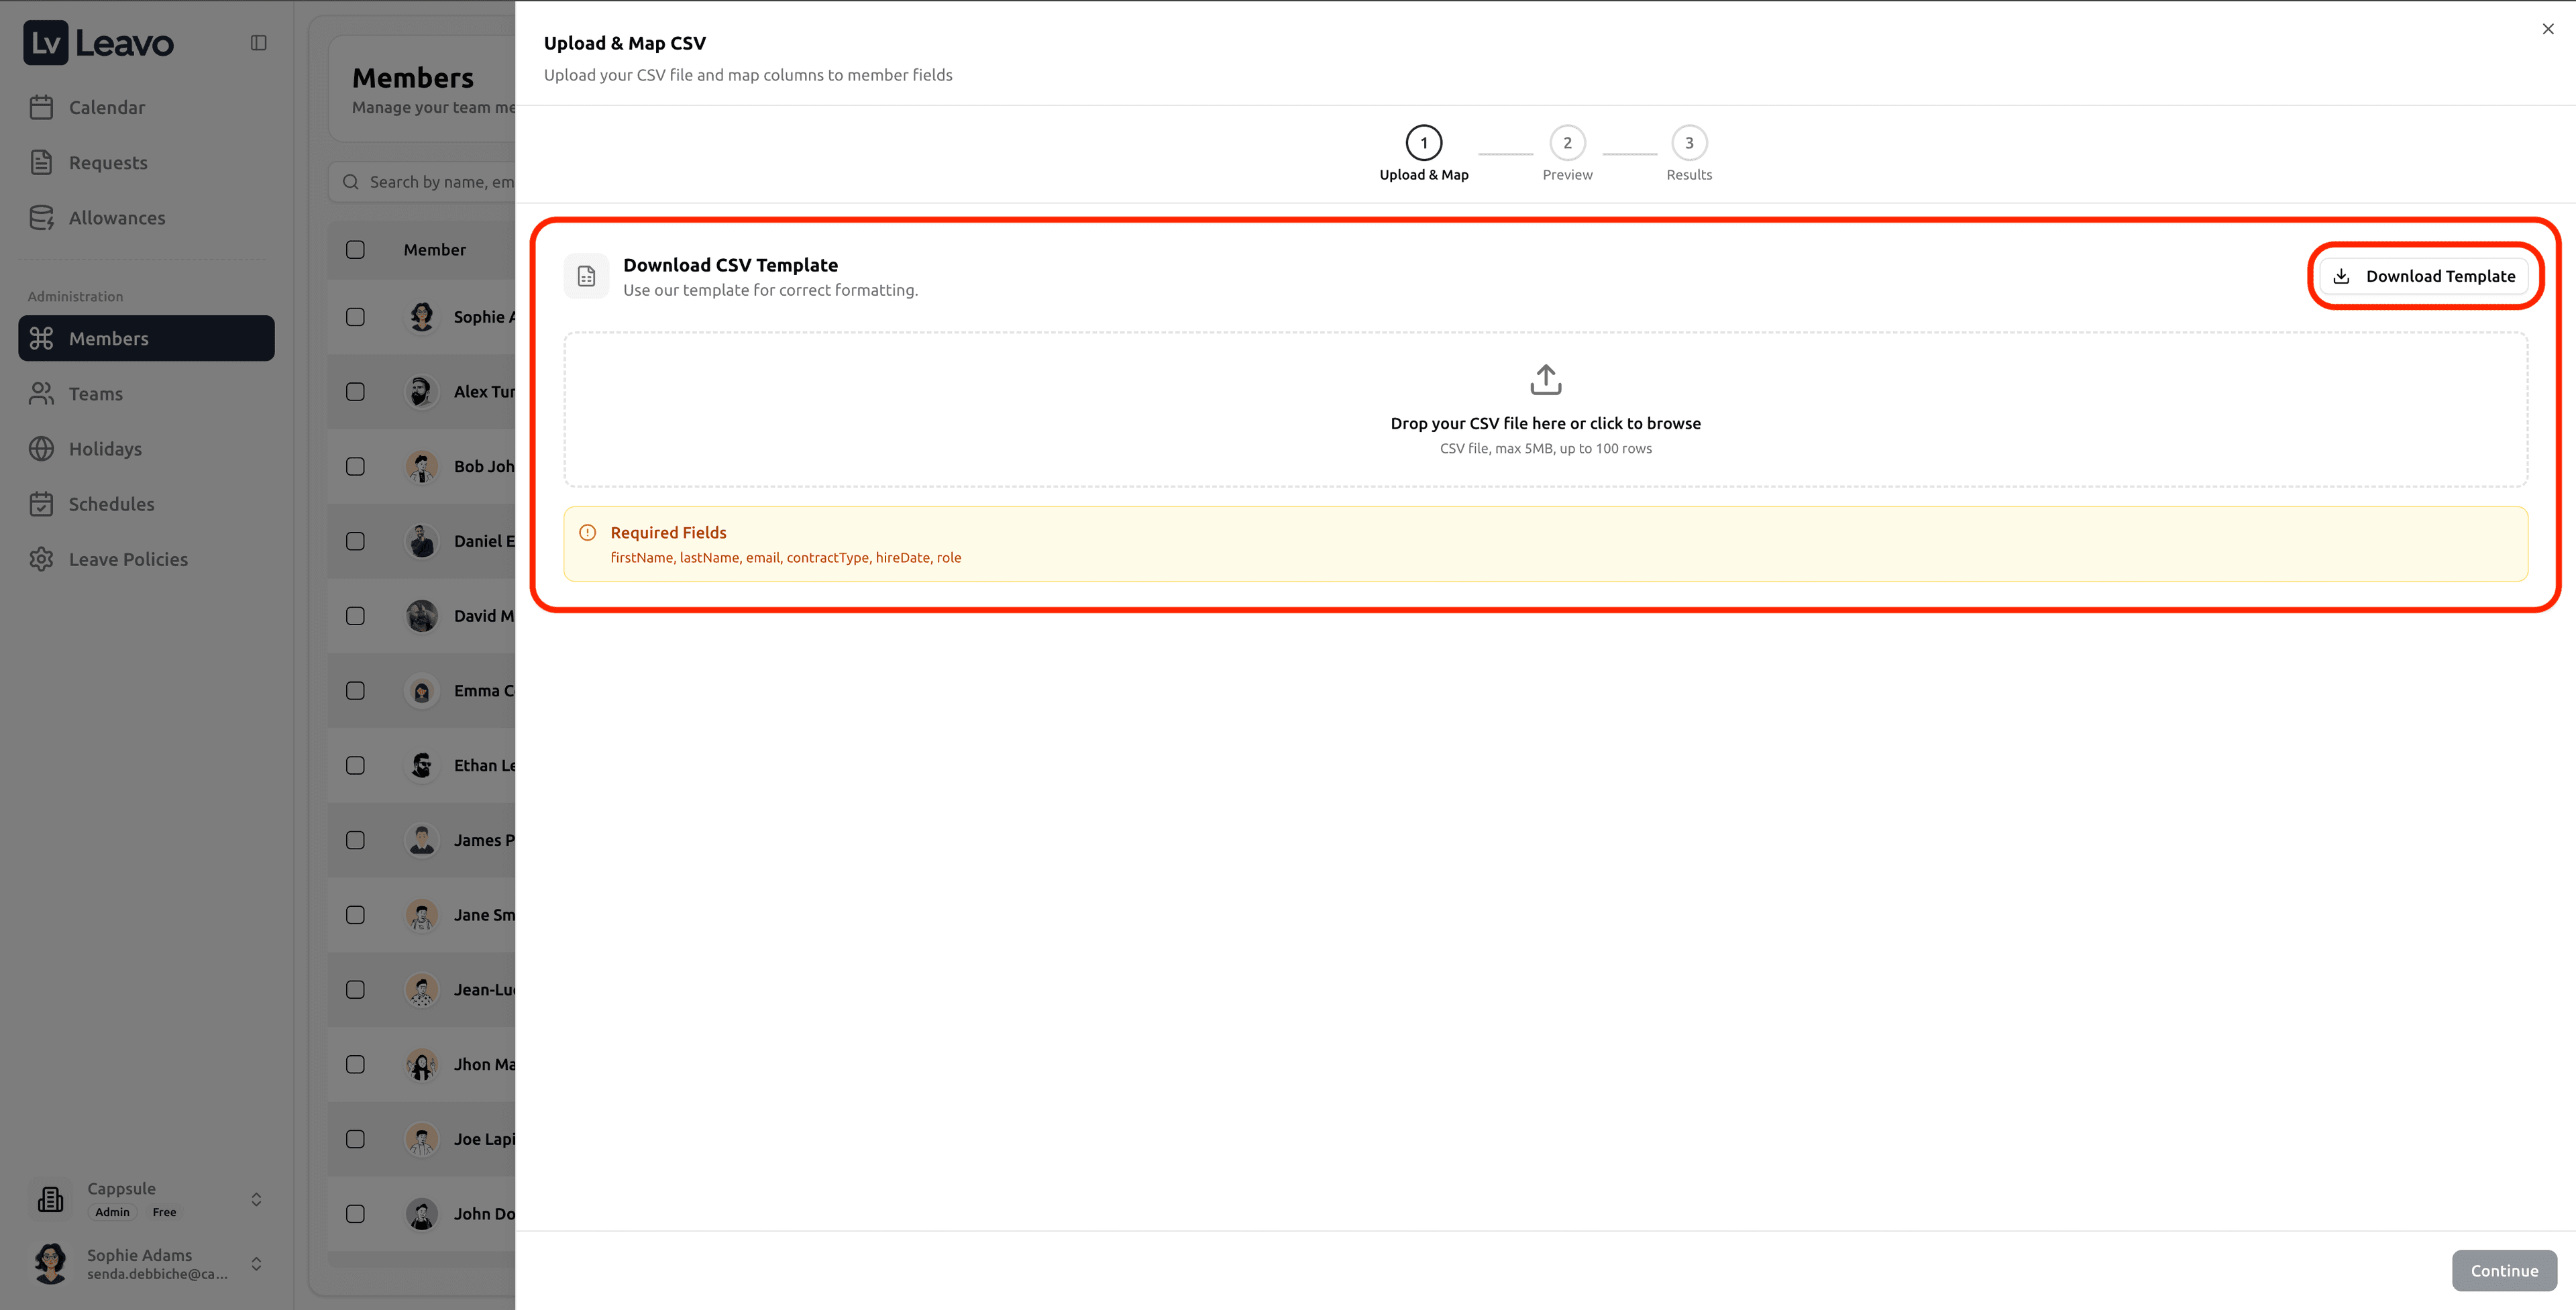
In the Upload & Map CSV modal, you can:
- Click Download Template to get a correctly formatted CSV
- Or drop your CSV file into the upload area (or click to browse)
Required fields are displayed in the modal, for example:
firstName,lastName,email,contractType,hireDate,role
Using the template is the fastest way to avoid formatting issues (dates, role values, contract types, etc.).
Step 2 — Map Columns to Member Fields
After upload, Leavo will automatically detect columns and try to map them to member fields.
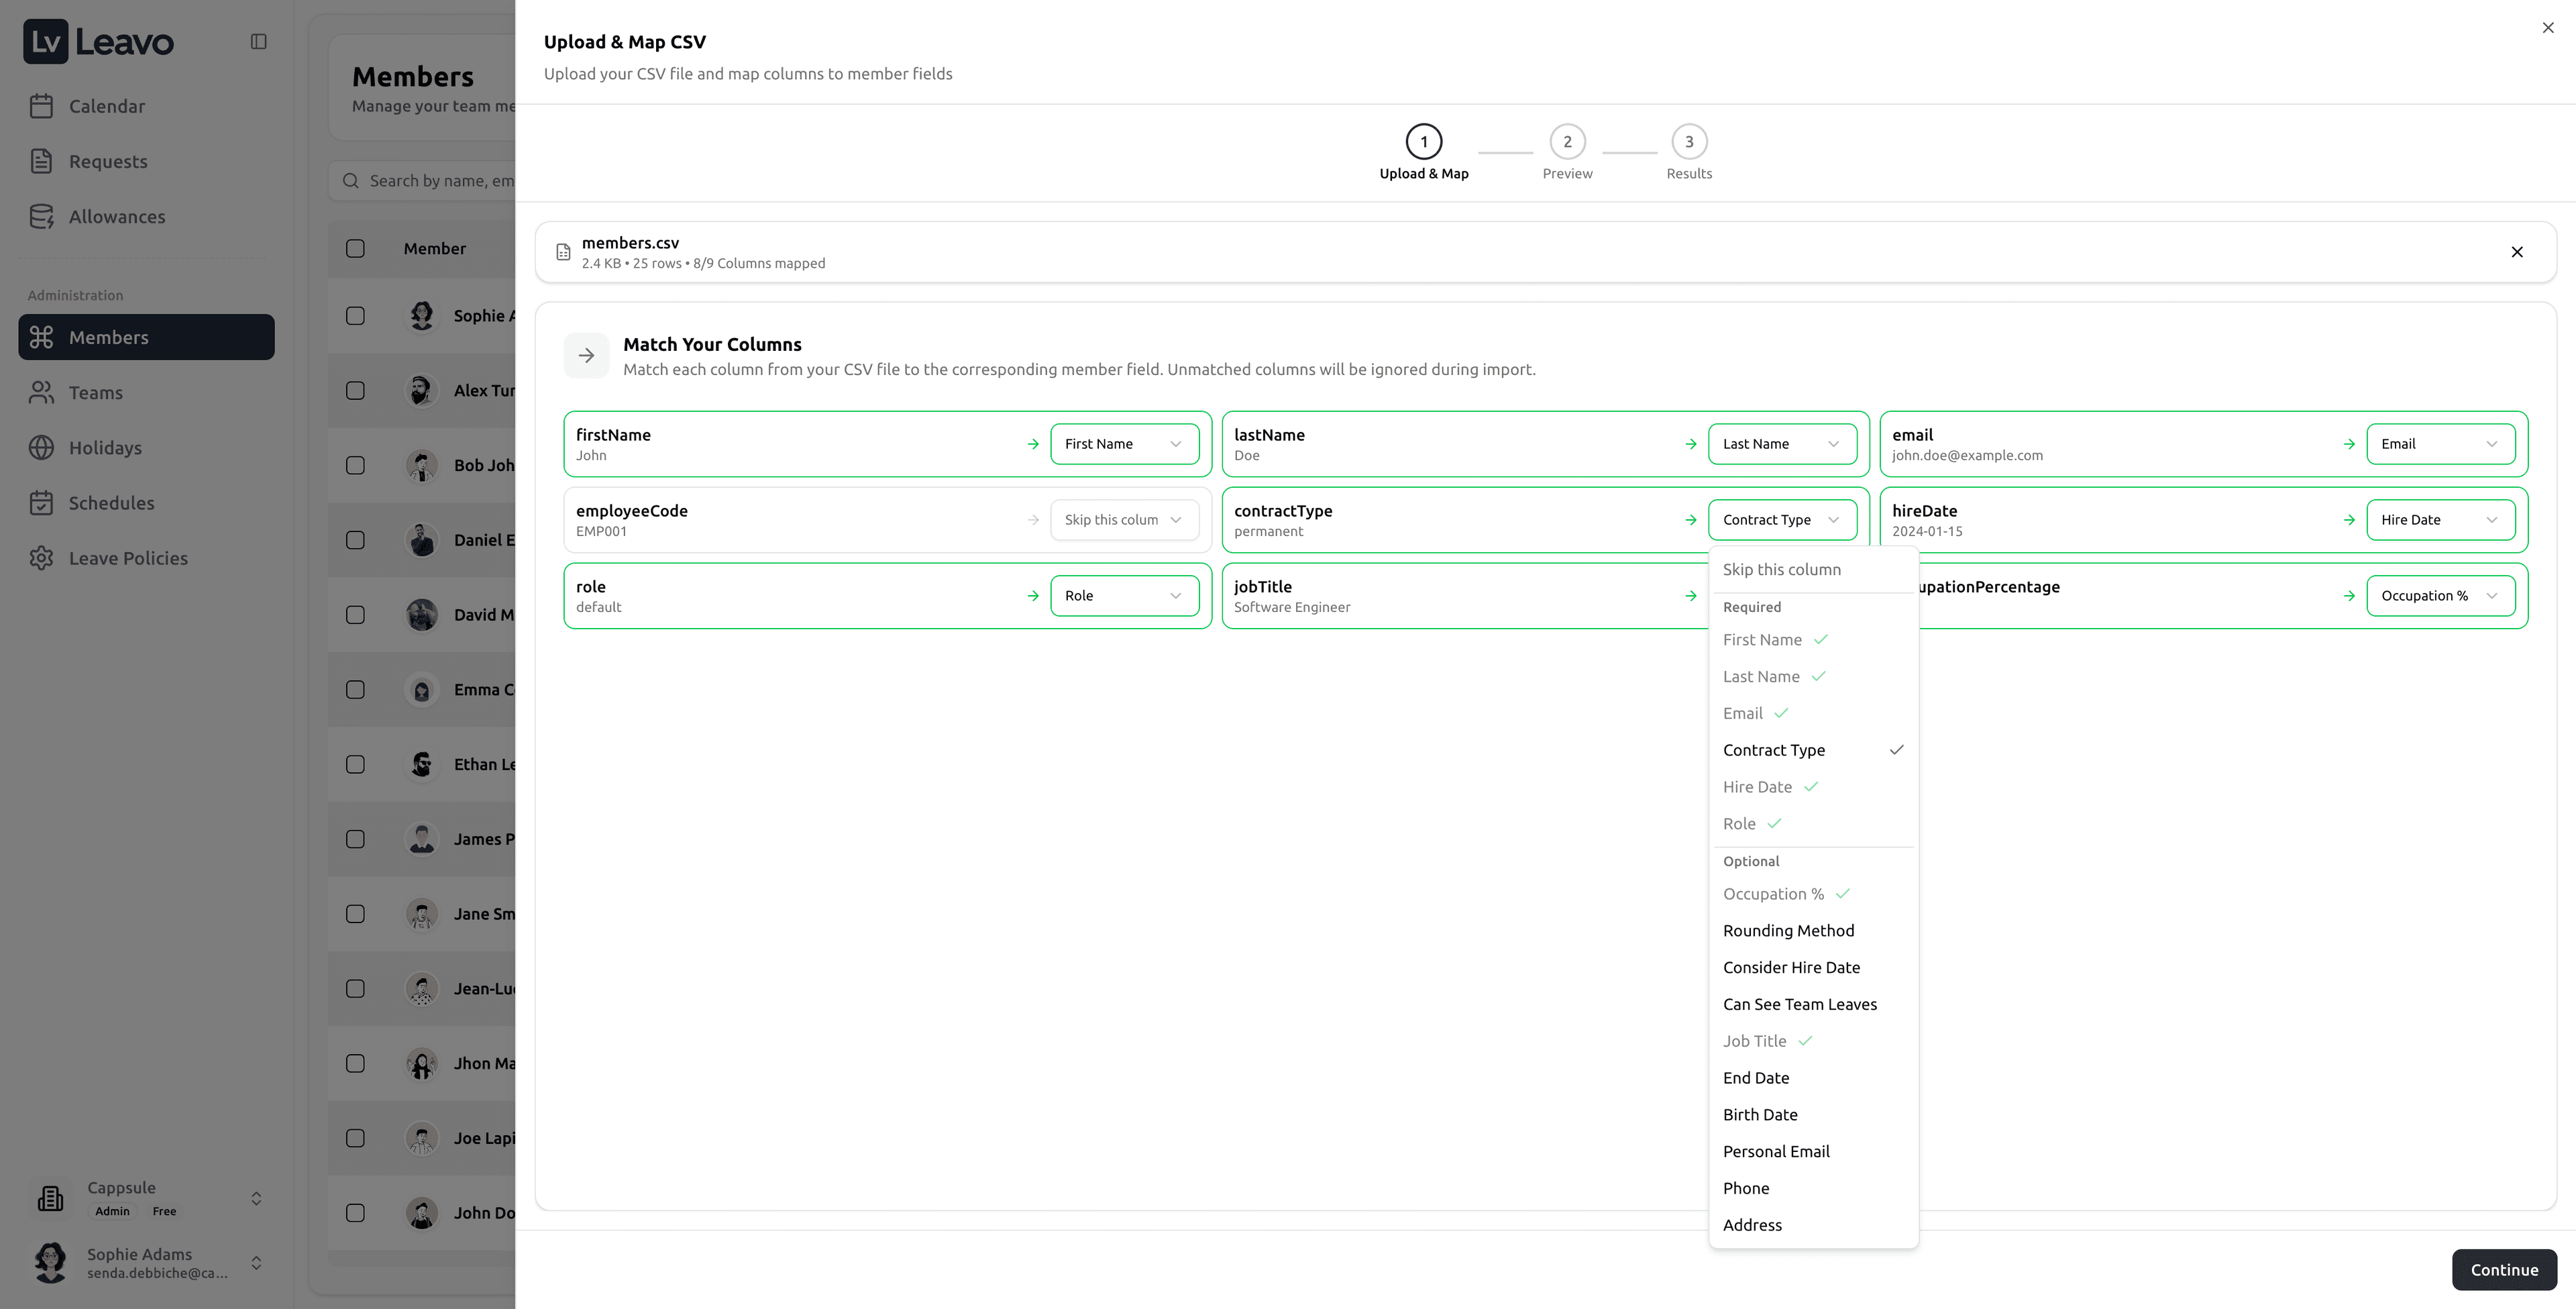
Review the Match Your Columns step:
- Confirm each CSV column is mapped to the correct field (First Name, Last Name, Email, Role, etc.)
- Any column you don’t want to import can be set to Skip this row
When everything looks correct, click Continue.
Step 3 — Preview & Fix Issues Before Import
In Preview & Edit, you can review all rows before importing.
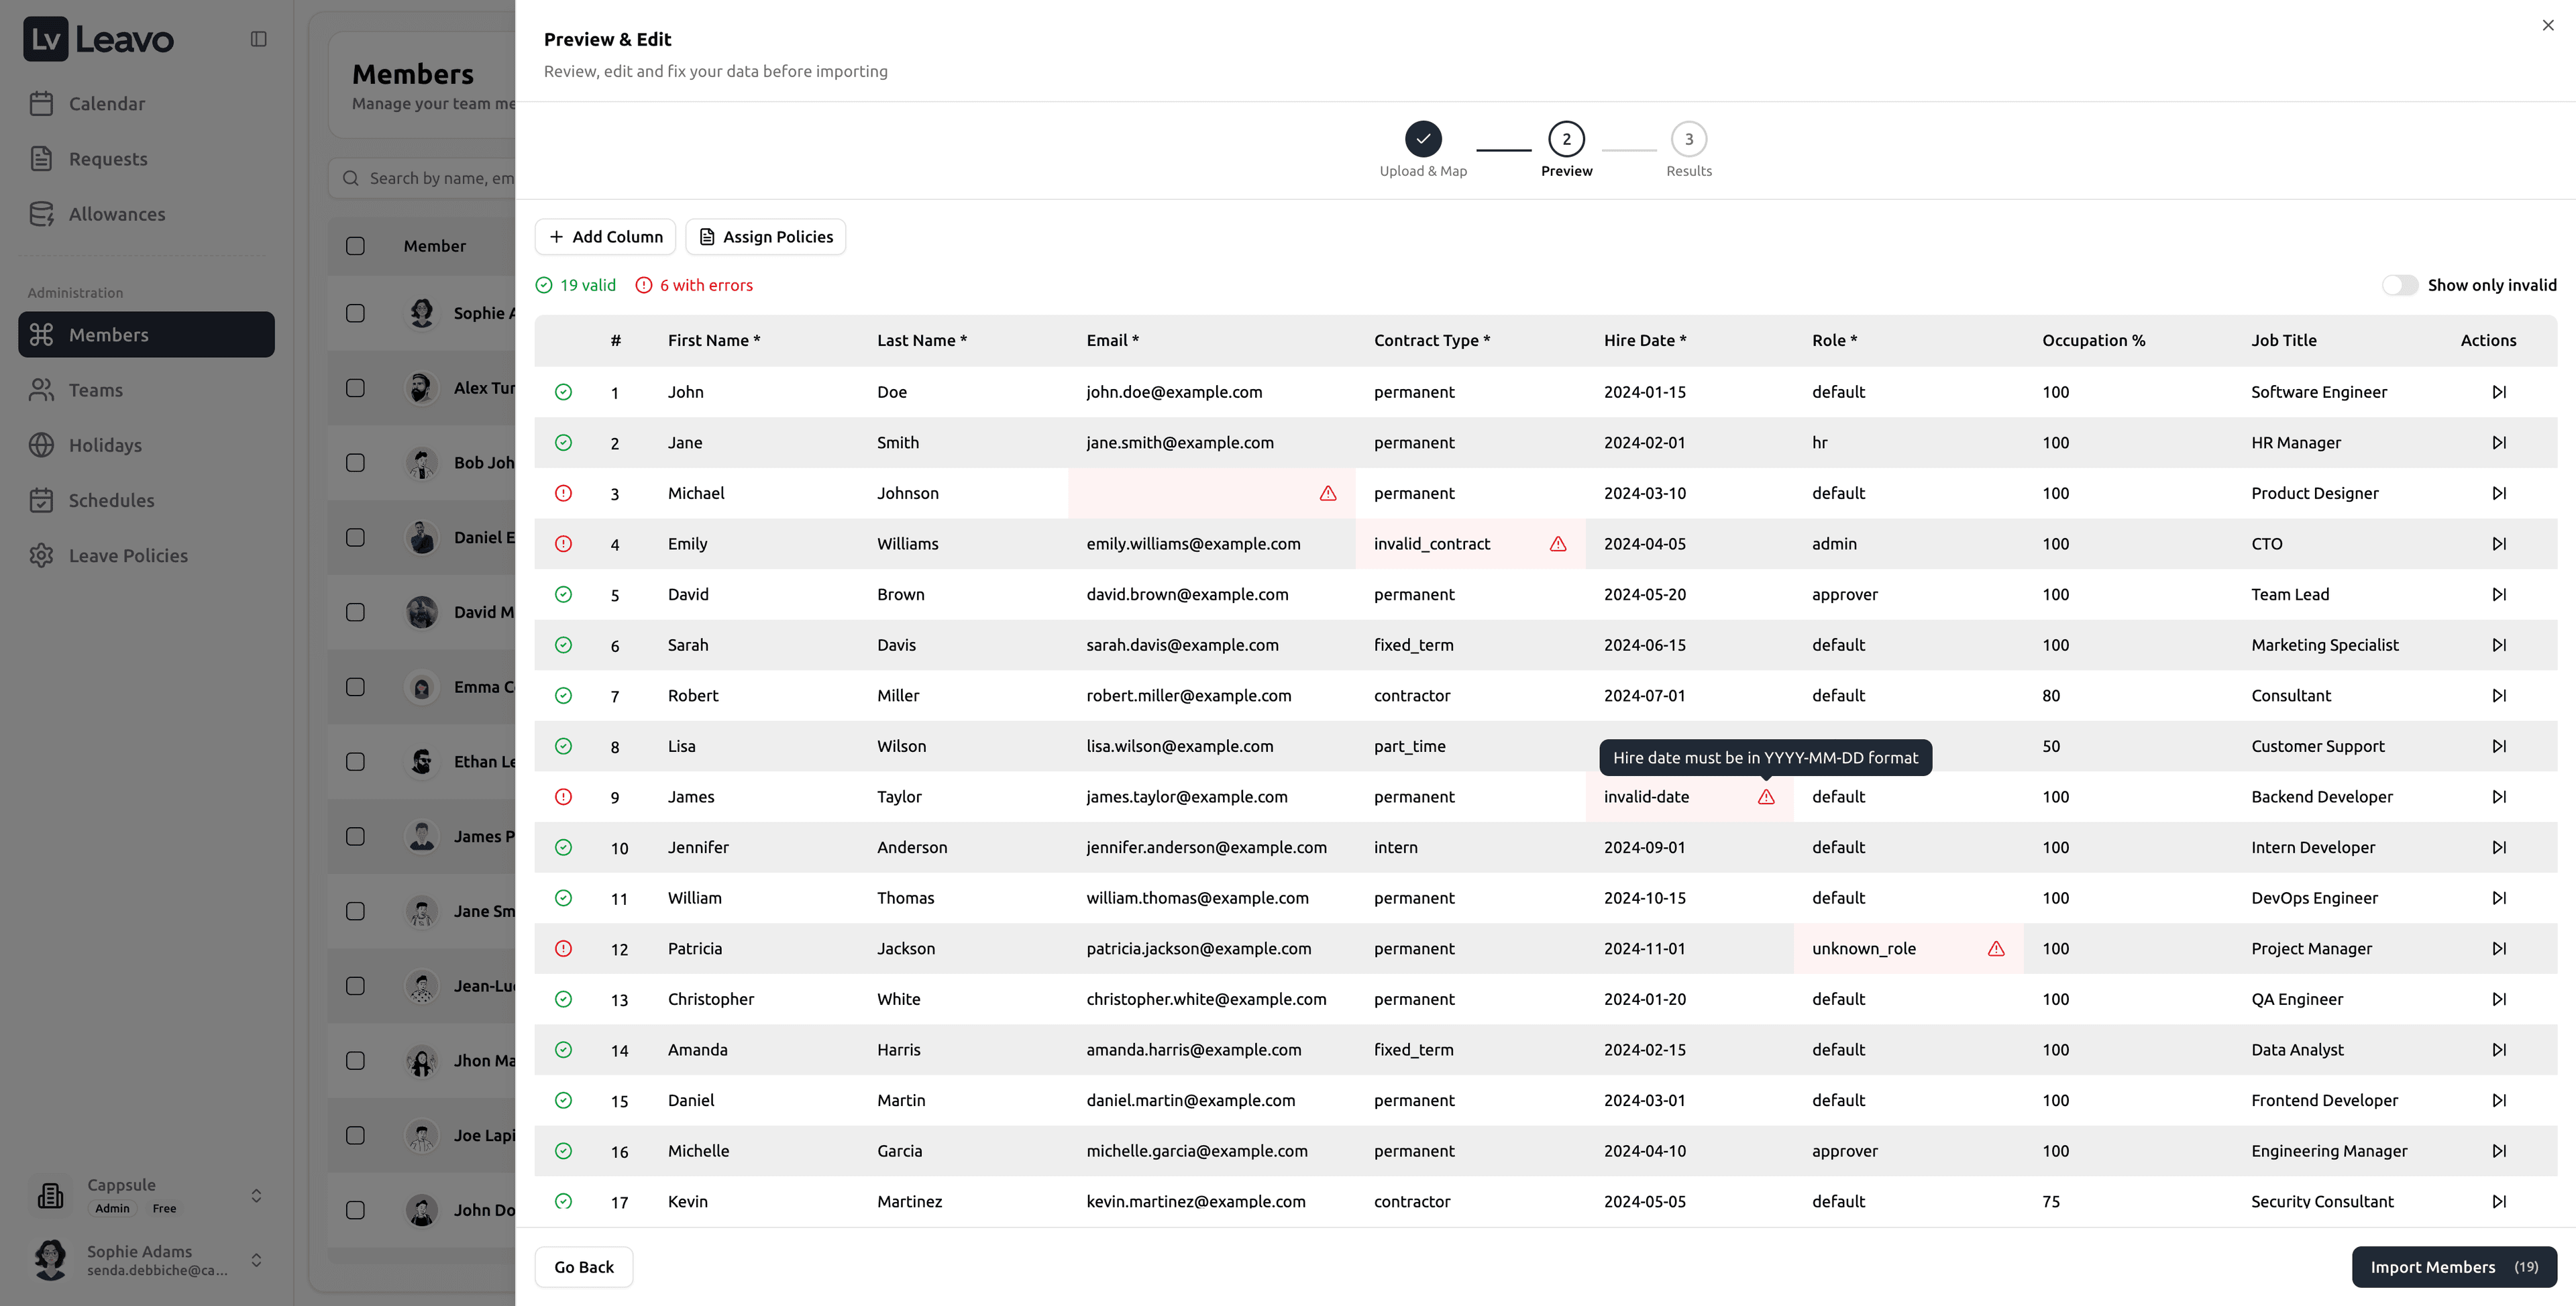
Leavo automatically validates the data and highlights errors, such as:
- Email already exists in the company
- Invalid contract type
- Invalid date format
- Unknown role value
You can then:
- Fix values directly inline (edit cells)
- Toggle Show only invalid to focus on problematic rows
- Skip row to ignore a record during import
Skipped rows are not imported. Only valid rows will be created.
Step 4 — Assign Teams, Schedules, Holidays, and Policies
Before importing, you can apply work settings in bulk so new members are ready immediately:
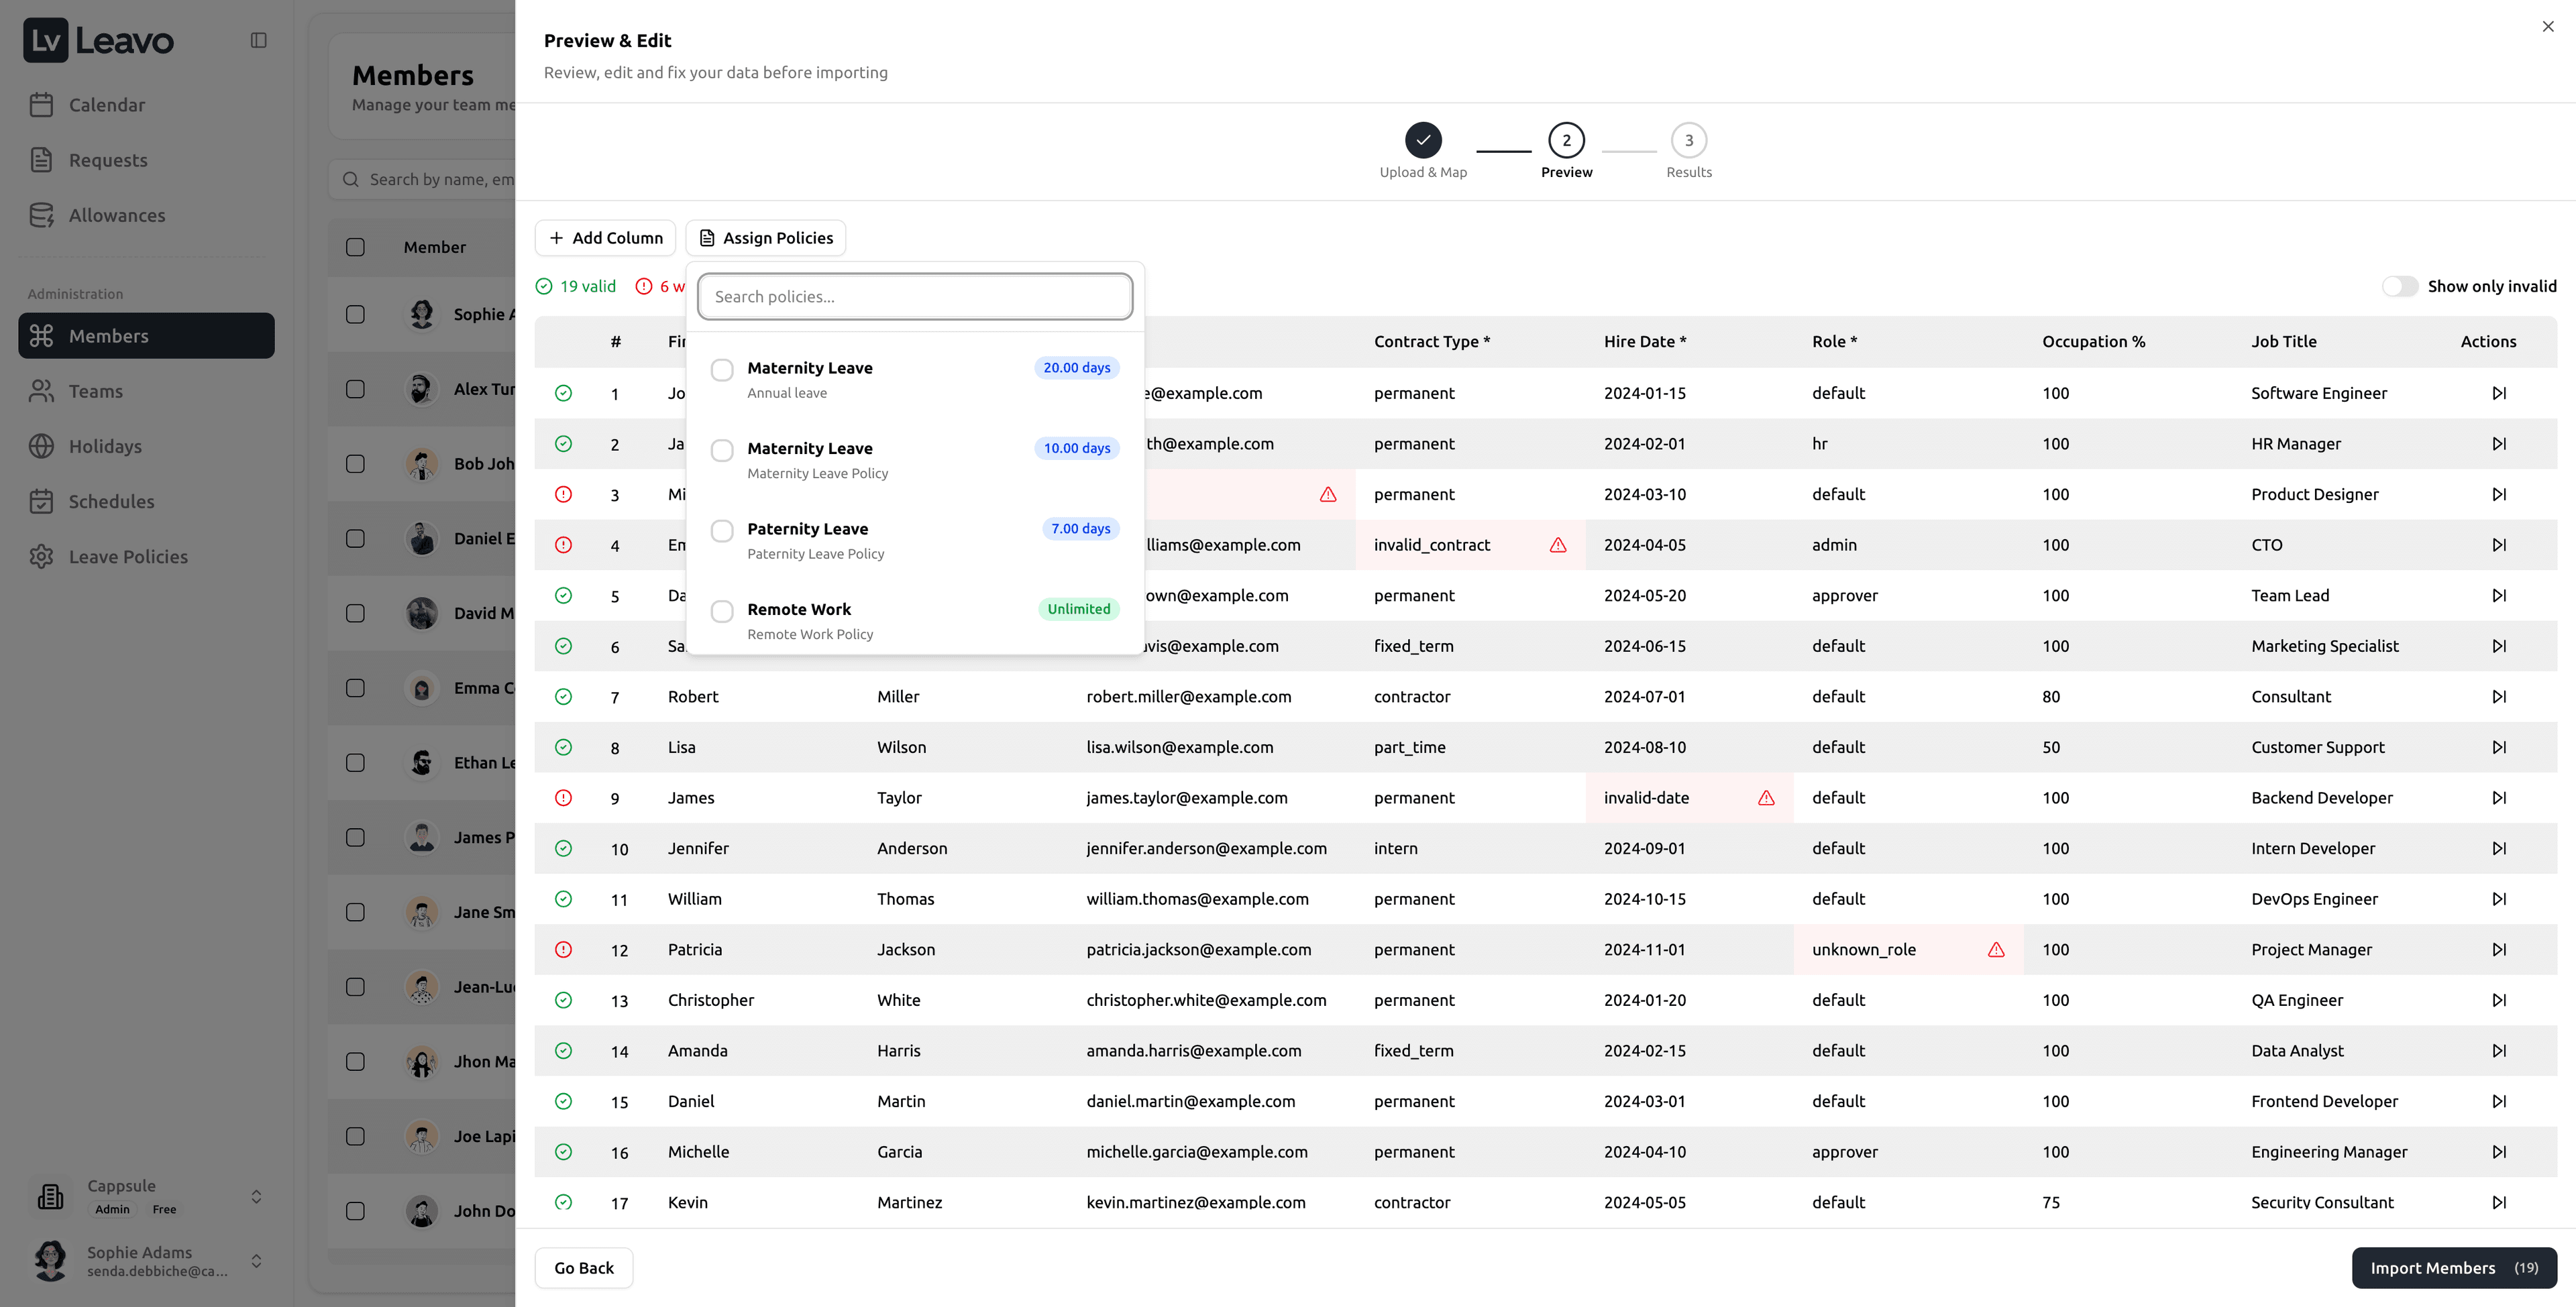
- Assign Team
- Assign Schedule
- Assign Holiday Set
- Assign Leave Policies
This ensures imported members have the required configuration for correct leave calculations from day one.
Step 5 — Import Results
After clicking Import Members, Leavo shows a results screen:
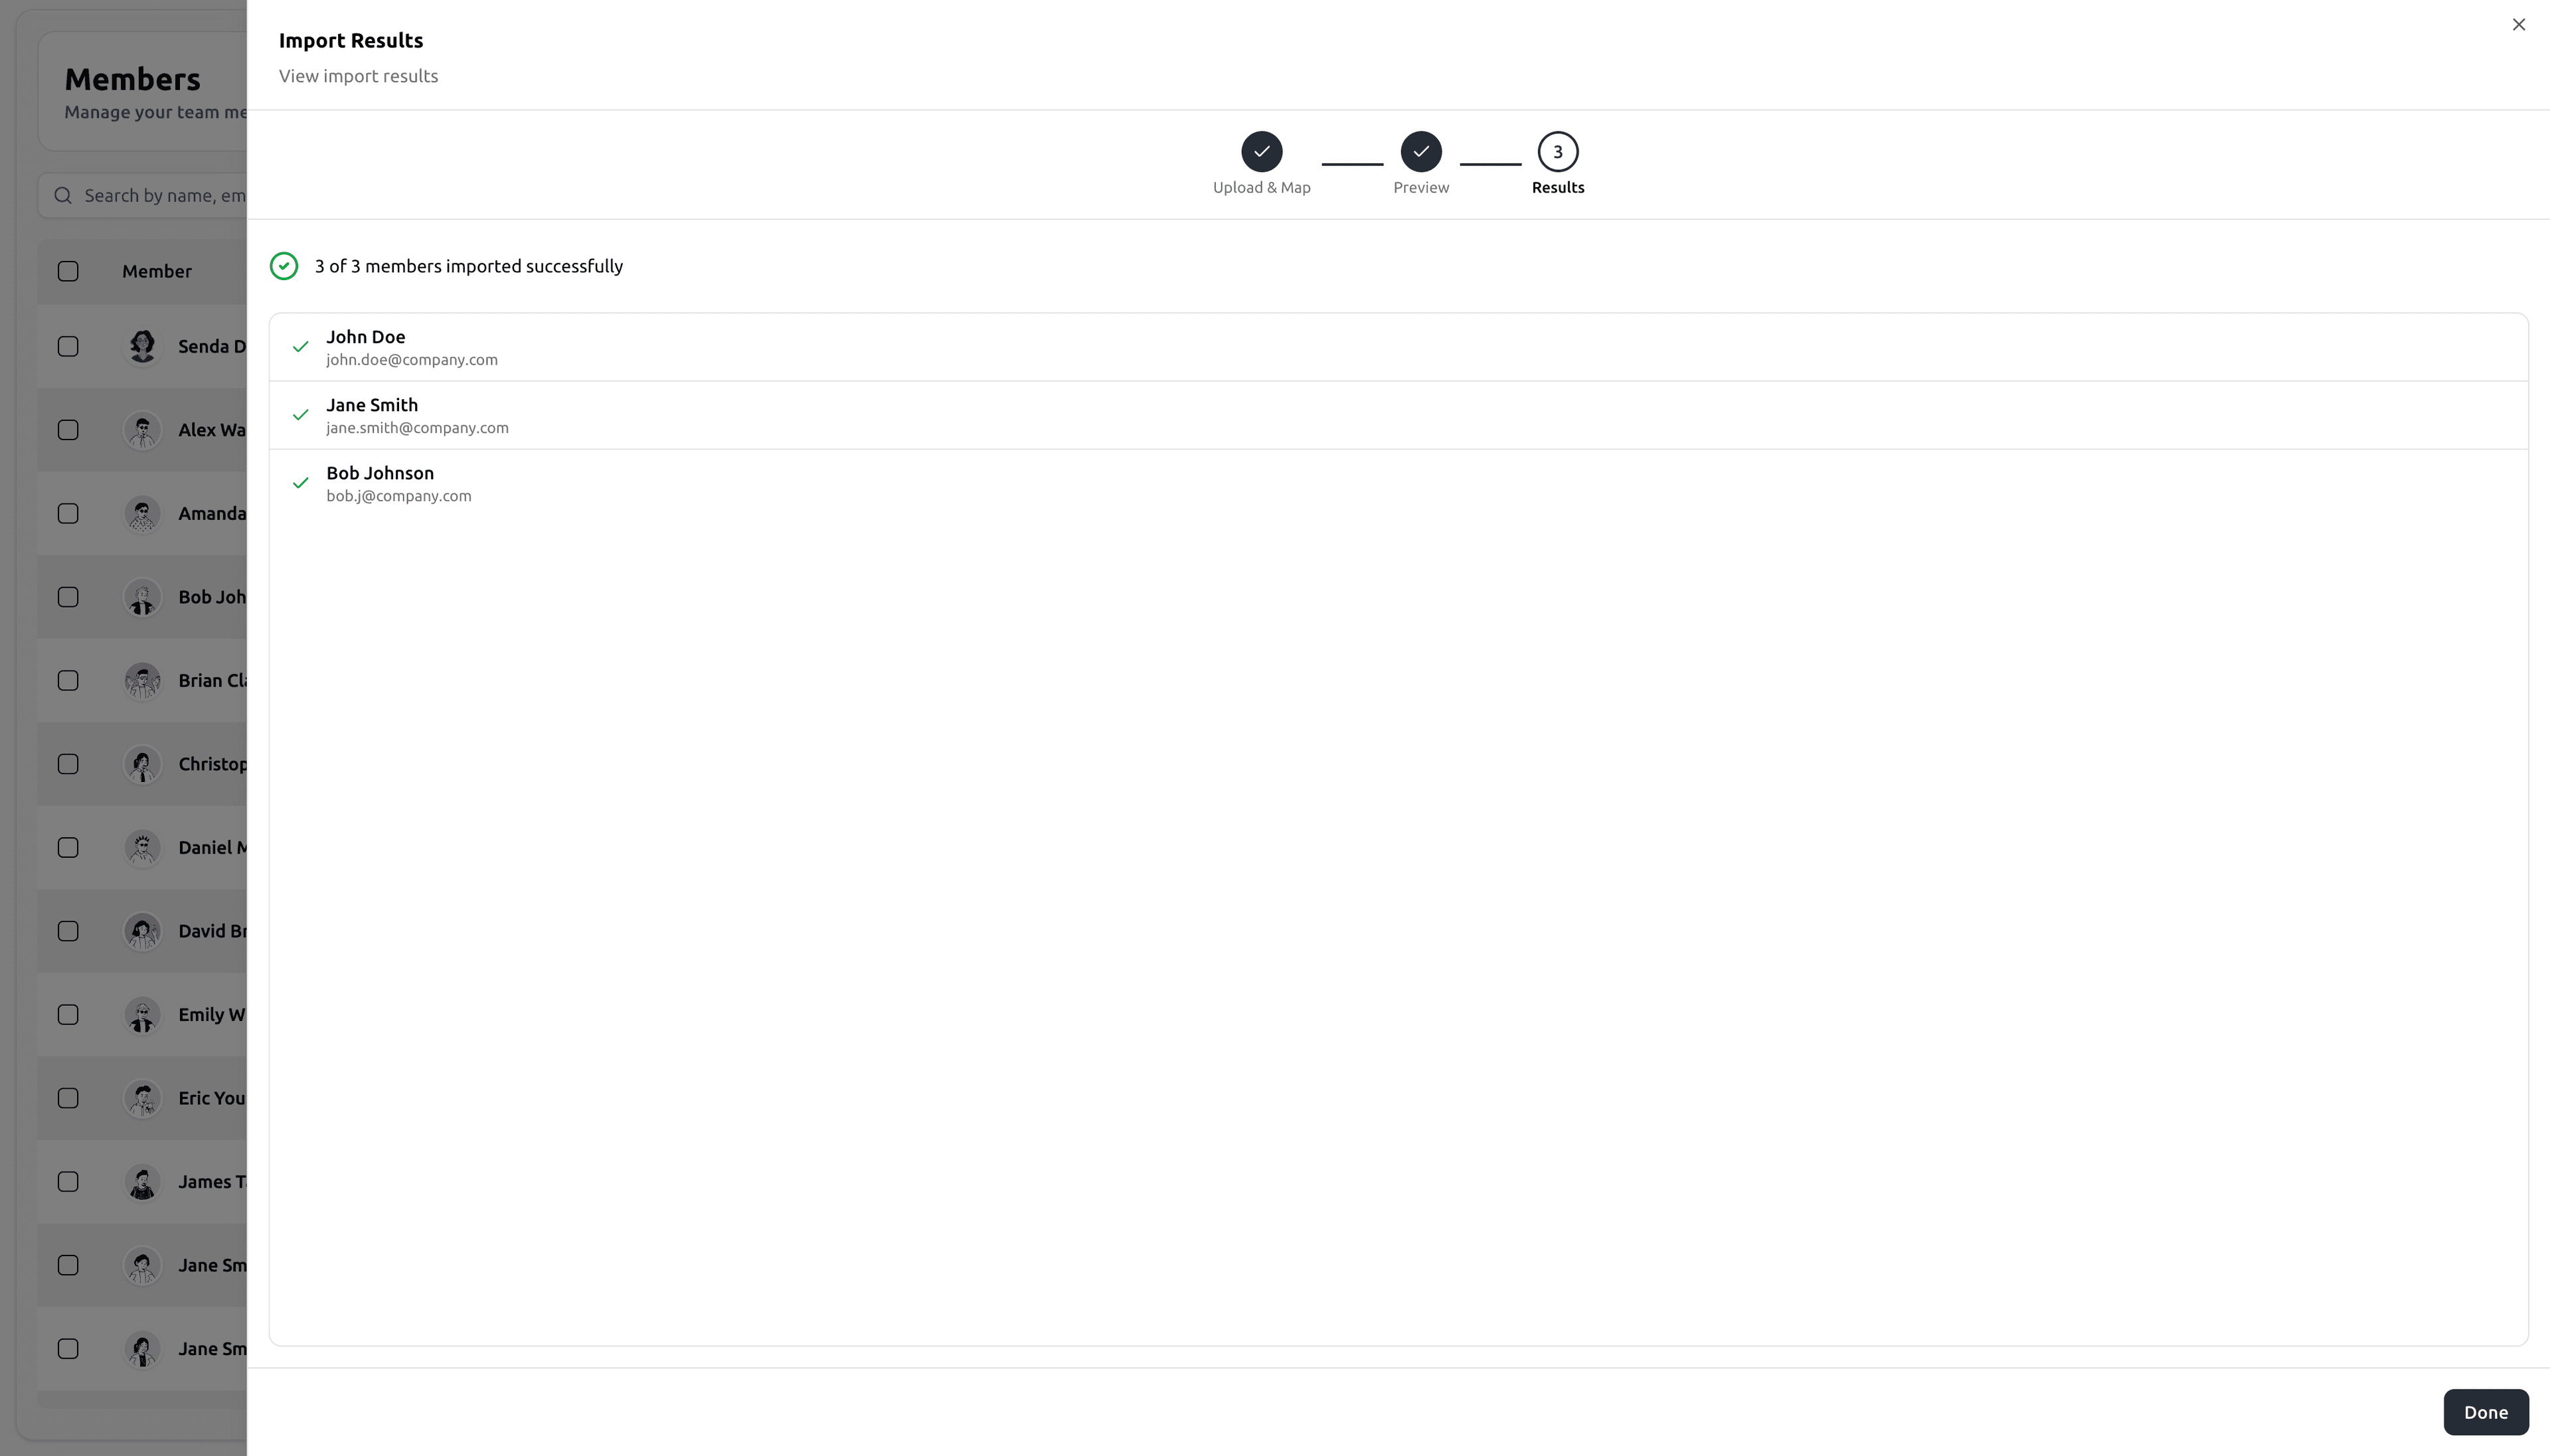
- How many members were imported successfully
- Which members were created
Click Done to close the modal, imported members will now appear in the Members table.
Add New Member
Click “Add Member” to open the creation form. The form is divided into five main sections:
1️⃣ Basic Information
| Field | Description |
|---|---|
| First / Last Name | Required: used to generate the Employee Code |
| Required: used for login and notifications | |
| Employee Code | Auto-generated based on name |
| Job Title | Optional field |
| Hire / End Date | Defines employment duration |
| Phone | Optional |
| Address | Optional |
| Timezone / Locale | Define working timezone and language |
| Contract Type | Permanent / Temporary |
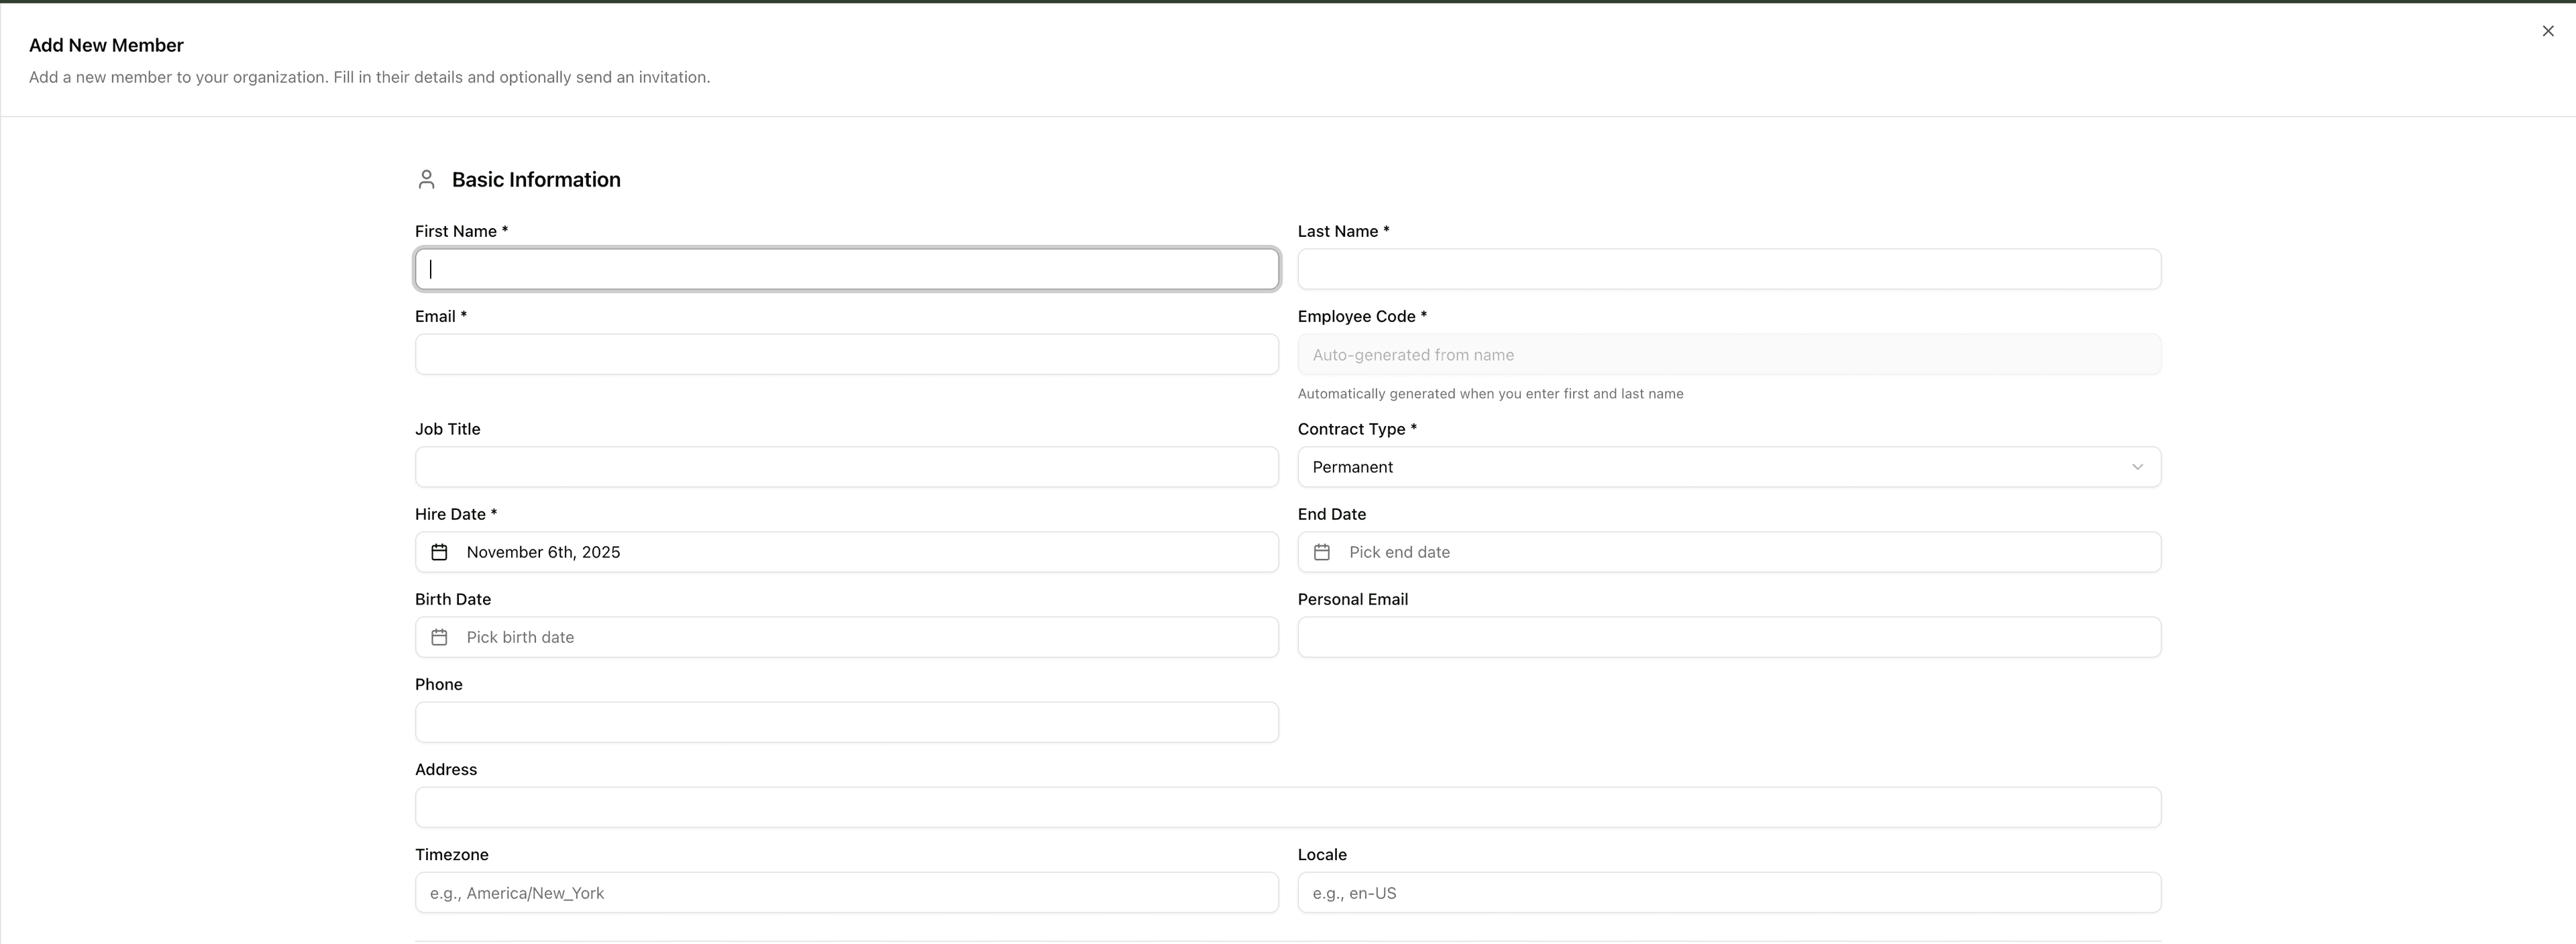
The email address is unique and tied to authentication.
Editing a member’s email later will reset their login credentials.
2️⃣ Copy Configuration
Use this feature to replicate settings from an existing member.

Ideal for onboarding multiple team members with identical setups (same team, approver, policies, and schedule).
Select an existing profile → all linked configurations are applied instantly.
3️⃣ Team & Role
Assign a role and structure:
| Field | Description |
|---|---|
| Role | Admin / HR / Employee |
| Team | Optional assignment |
| Team Approver | Auto-assigned from team |
| Direct Approver | Optional approver who overrides team approver |
| Permissions | Option: “Can see team leaves” (enabled for managers) |
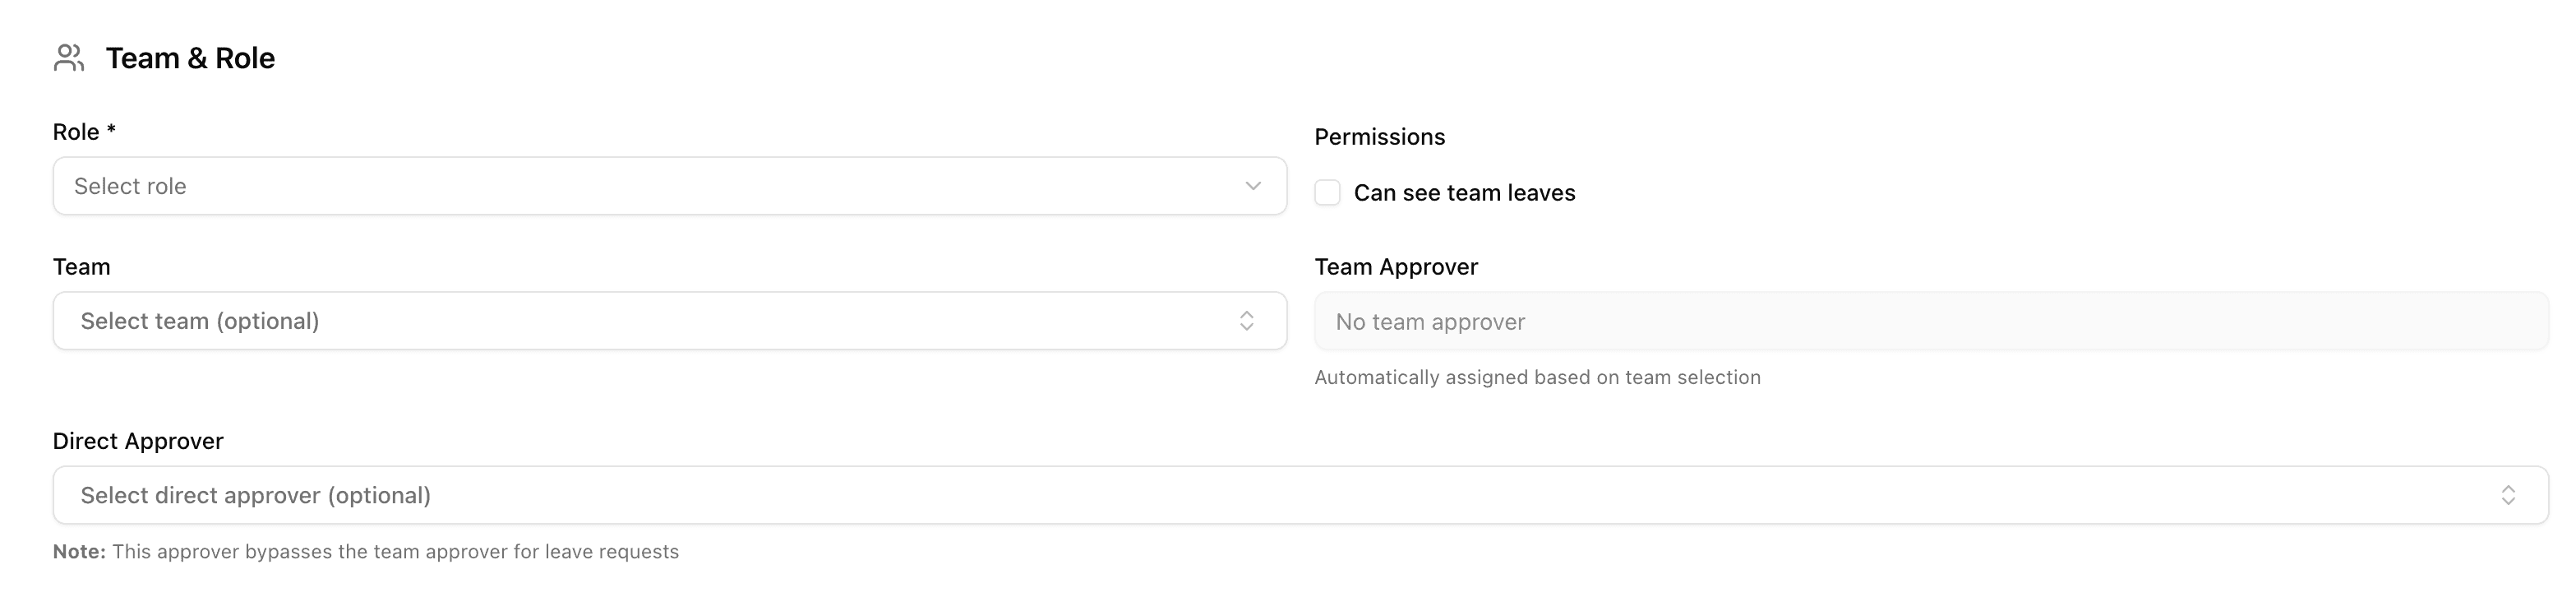
Direct approvers are useful for specific approval hierarchies, when a team member reports to a different department head.
4️⃣ Leave Policies
Assign applicable leave policies to each member.
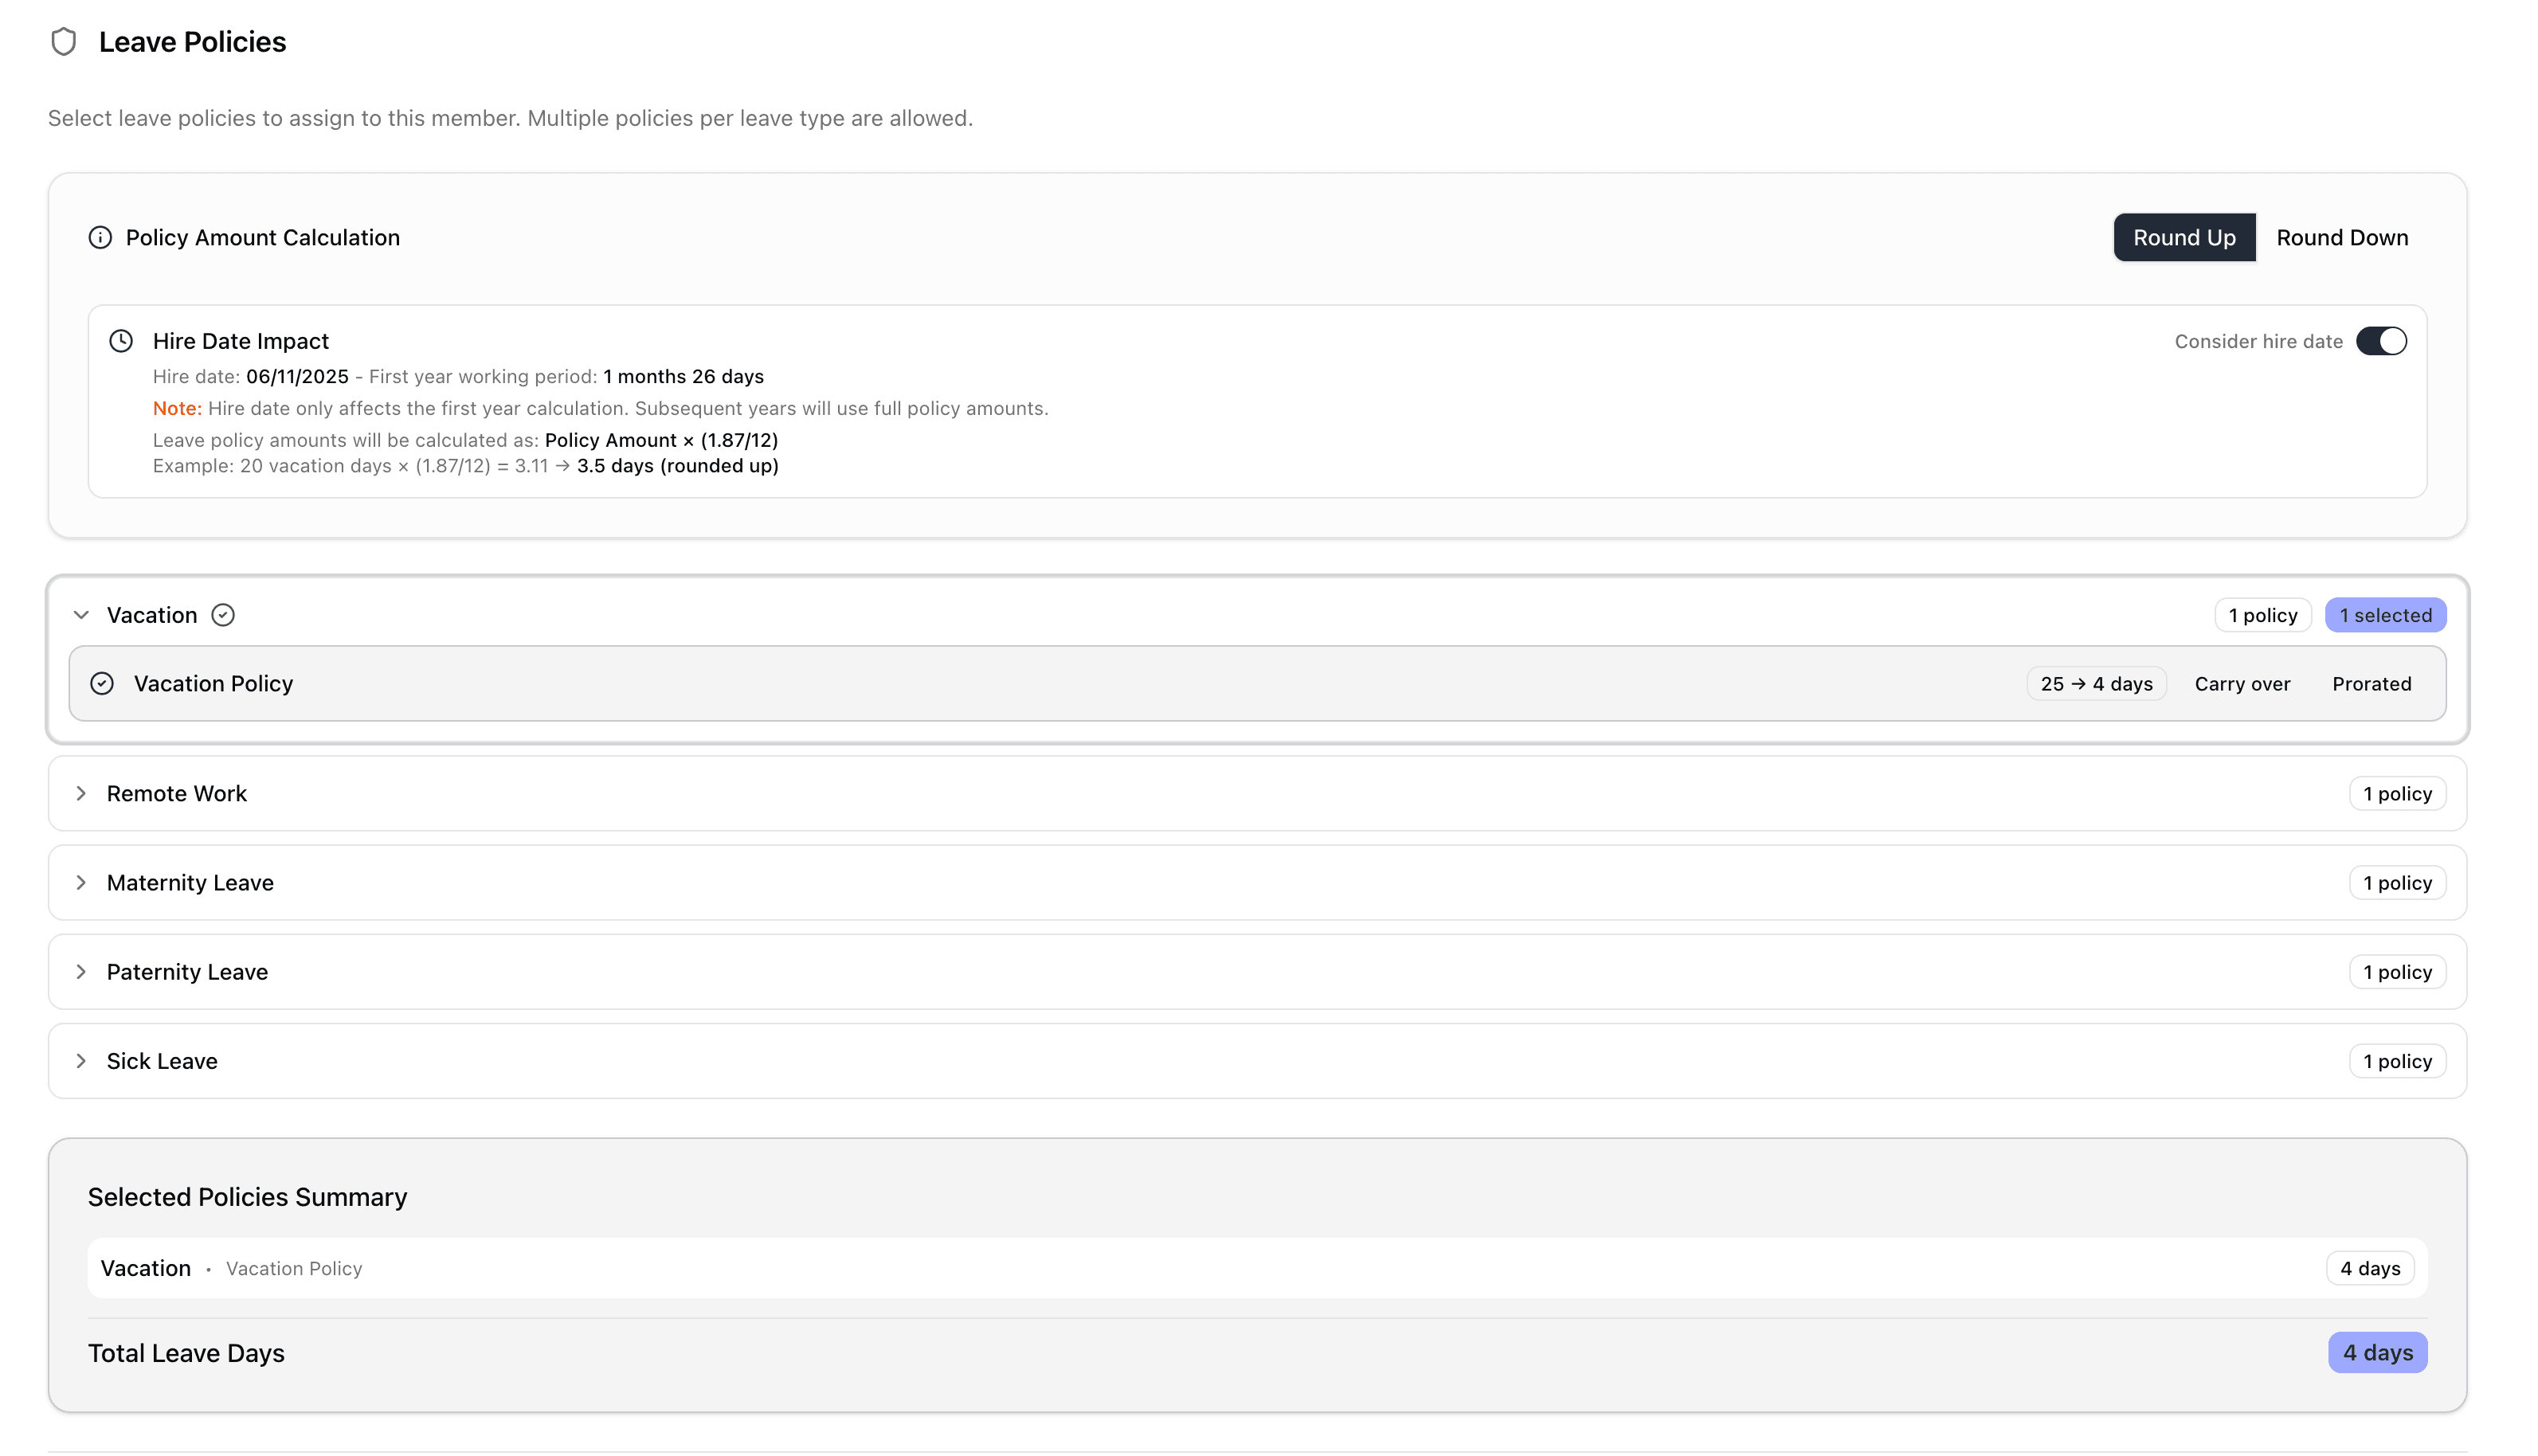
Supported types:
- Vacation
- Sick Leave
- Remote Work
- Maternity Leave
- Paternity Leave
Each policy includes:
- Carry-over rules
- Prorated calculation
- Hire date impact
- Rounding options
Example If hire date = November
5, 2025 → 20 vacation days × (1.9/12) = 3.17 ≈ 3.5 days (rounded up)
You can toggle “Consider hire date” to prorate the first year’s allowance automatically.
Great for onboarding mid-year employees.
5️⃣ Schedule & Holidays
Discover how to set up schedules and holidays.
| Section | Description |
|---|---|
| Work Schedule | Default (Company Standard) or custom |
| Schedule Details | Working days, weekly hours, and timezone |
| Holiday Calendar | Assign a predefined set (Switzerland, France) |
| Holiday Preview | Lists all holidays for the selected region |
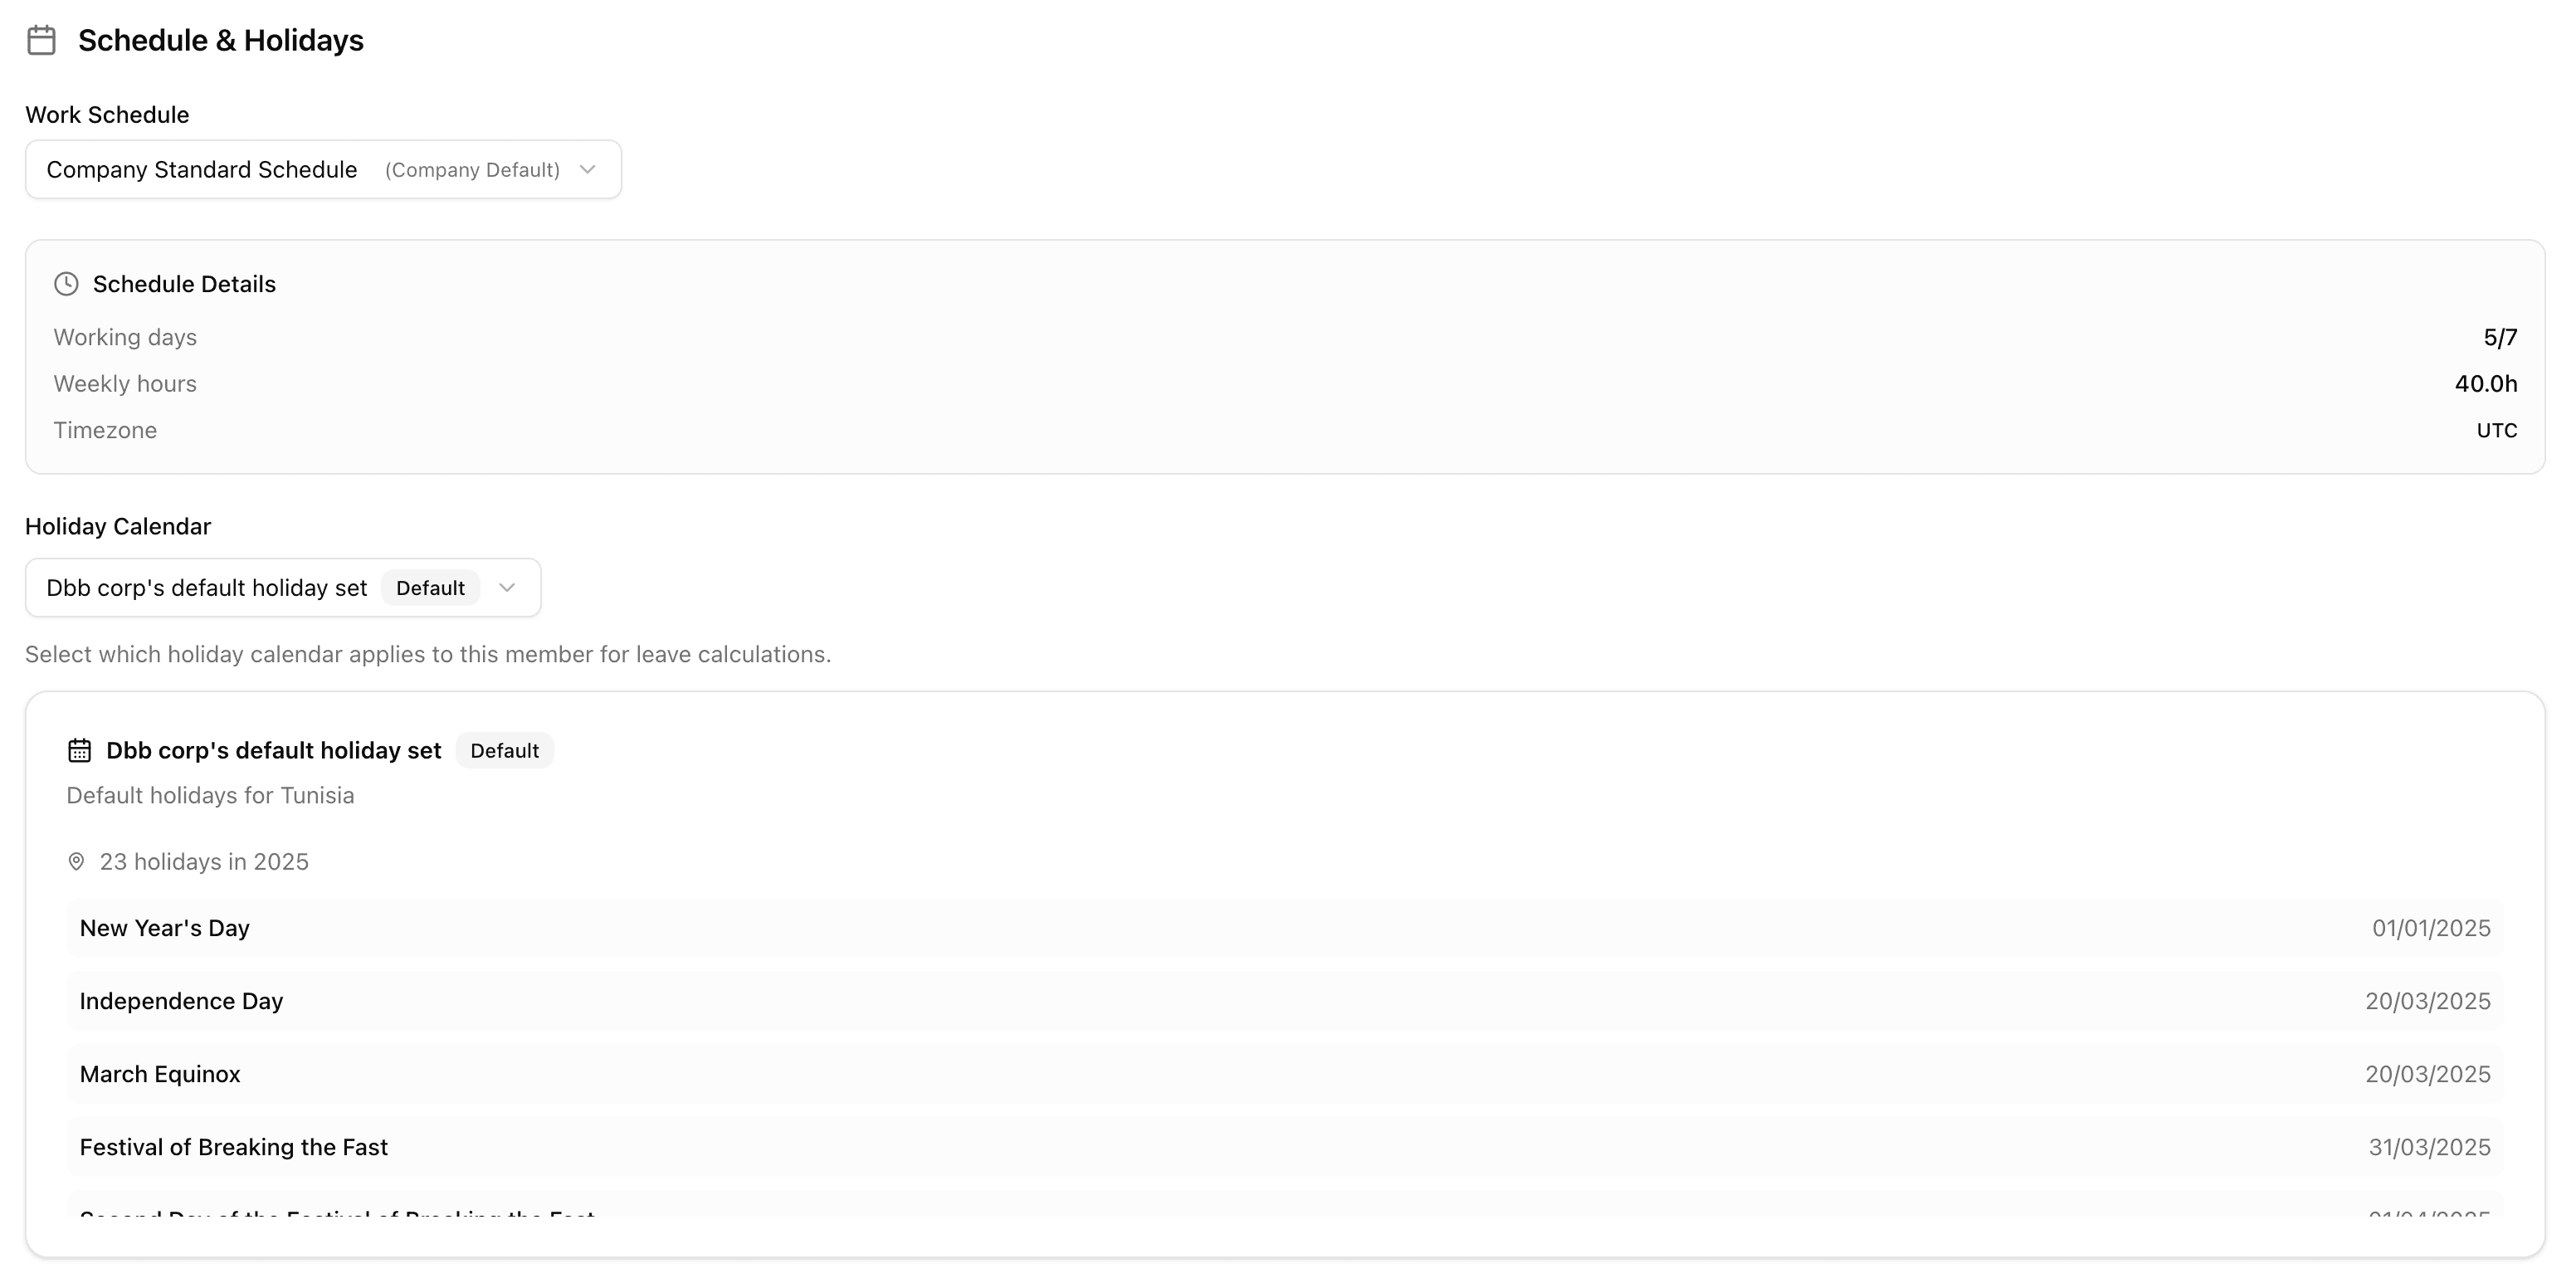
Each member must have a Work Schedule and Holiday Set to ensure leave balance calculations are correct.
Final Step
At the bottom of the form:
- Create Member — Save without invitation
- Create & Invite — Send a welcome email immediately
Invited members will receive a login link and must activate their account.
The login link can only be used once. After that, the invite link expires.
Edit Member
Editing follows the same layout as creation.
Admins can update:
- Contact information
- Role or approver
- Leave policies and schedules
When you modify a policy or schedule, changes take effect immediately and update all related balances.
Member Actions
In each row, the Actions column includes shortcuts for admin operations:
| Icon | Action | Description |
|---|---|---|
| Edit Member | Opens the edit form | |
| Deny Access | Revokes login rights temporarily | |
| Schedule Adjustments | Opens a yearly calendar to modify specific working days | |
| Suspend Member | Deactivates member access entirely | |
| Reactivate Member | Restores access and reactivates an inactive member |
Schedule Adjustments
The Schedule Adjustments feature allows Admins and HRs to modify a member’s working days for specific dates (schedule exceptions or temporary changes) without altering the base schedule.
Adjustments apply instantly and affect:
- Daily working hours
- Leave calculations
- Calendar visibility
- Request summaries
Impact on Existing Leave Requests
Any change to a member’s schedule including those made through Schedule Adjustments can retroactively affect how their leave requests are calculated.
If the member already has approved leave requests, the Request Summary and Allowance balance shown in the Edit Request drawer may differ from the values in the Requests table.
This difference is normal and expected.
Why does this happen?
- The Requests table displays the stored calculation from when the request was originally created.
- The Edit Request drawer performs a real-time recalculation using the current working days, holiday set, and schedule.
Example:
A request created when Monday was a working day may display different totals if Monday is later changed to a non-working day.
Leavo dynamically recalculates:
- Working days
- Deducted allowance
- Hours
- Balance impact
This may lead to visible discrepancies between:
- The stored request in the table
- The recalculated request summary in the drawer
- The allowance shown in the member’s profile
This is intentional: the system always uses the most accurate and up-to-date rules for recalculations.
Understanding the Difference Between Stored Data and Live Calculations
It is possible and expected that:
- The Requests table shows the original stored values (historic data).
- The Edit Request drawer and Balance preview show recalculated values based on updated schedules.
This discrepancy occurs because the system recomputes leave using the current schedule, not the historic one applied when the request was created.
This can happen when:
- Weekends/workdays change
- Hours per day change
- Custom adjustments are applied to future dates
- Regional holiday sets change
- Member schedule changes to part-time/full-time
Best Practice Recommendation
To keep your data coherent across Requests, Calendar, and Allowances, we recommend:
- Reviewing all upcoming or future approved requests after making schedule changes.
- Editing and re-saving each affected request even if no dates change.
This refreshes the stored calculation so it matches the current rules.
Doing this ensures:
- Fully synchronized request data
- Accurate balances
- Consistent display between table and drawer
- No mismatches caused by historic schedules vs updated schedules
This practice is highly recommended for:
- Members moving from full-time → part-time
- Teams with frequent schedule exceptions
- Companies updating standard working hours
- Employees switching regions or holiday sets
Why Leavo Works This Way
Leavo preserves historic values for auditability but provides live recalculation to ensure accuracy for current operations.
This hybrid behaviour ensures:
- Transparency
- Compliance with HR rules
- Accurate deductions
- Traceability over time
You always know what was originally approved and what the current impact would be.
Summary
When using Schedule Adjustments:
- Approved requests may show different totals when edited later
- Balances may update dynamically
- Table values = original record
- Drawer values = recalculated based on new rules
- Best practice = re-save future requests after schedule changes
This provides the most consistent and accurate HR data across the workspace.
Suspending a member prevents them from requesting leave, but keeps their data and balances intact.
Roles & Permissions
Leavo uses three main roles to control what each user can see and do:
- Admin – Full control over the workspace: access to all Administration pages (Members, Teams, Holidays, Schedules, Leave Policies, etc.), all members, and all requests.
- HR – Operational access to manage requests, calendar, and allowances, and to help maintain member data, while having fewer workspace-wide privileges than Admins.
- Default (Employee) – Standard employee profile: can view and edit their own information, request leave, and see only what has been shared with them (for example, team leaves, if allowed).
Changing a Member’s Role
When you change a member’s role, the new permissions apply immediately:
-
Changing a Default member to Admin:
- The user gains access to the full Admin panel.
- They can see all members in the company and manage administration settings according to the Admin role.
-
Changing an Admin to Default:
- The user loses access to all Administration pages.
- They can no longer manage members, policies, holidays, or schedules.
- They keep their own account and existing leave history but behave like a regular employee for future actions (can only submit and view their own requests).
When you demote a user (Admin or HR) who is also used as an approver, Leavo does not automatically reassign a new approver.
You must review and update approvers manually to avoid approval bottlenecks.
Approvers & Role Changes
Some members may be configured as:
- Team Approver (for a specific team)
- Direct Approver (for a specific member)
When you change their role:
- If you change an Admin or HR who is a Team Approver to Default:
- Another Admin or HR must manually update the Team Approver in the team configuration.
- If you change any Approver to Default:
- You must manually assign a new approver for the affected member(s) or team(s).
Until a new approver is assigned, leave requests may not be processed correctly. The former approver might still receive notifications but can no longer take action on those requests.
Access Restrictions & Safety Rules
To protect your workspace from accidental lockouts:
- As an Admin or HR, you cannot revoke your own access (the Deny Access action is disabled for your own account).
- As an HR, you cannot revoke access for an Admin. Only Admins can manage other Admins’ access.
These safeguards ensure there is always at least one account with full access to manage the workspace.
Troubleshooting
| Issue | Cause | Solution |
|---|---|---|
| User cannot log in | Access = Revoked or Invite Expired | Set Access to Granted; resend invite |
| Member cannot approve leave | Role = Default | Change role to HR or Admin |
| Requests stay Pending | Approver missing | Assign Team Approver or Direct Approver |
| Balance incorrect | Schedule changed | Edit + re-save future approved requests |
| Cannot select approver | Role = Default | Only Admin/HR can approve |
| Leave policy missing | Year or policy not assigned | Add policies in member profile |
| Table vs drawer mismatch | Historic vs recalculated values | Re-save requests to realign |
Pro Tips
Quick Onboarding: Use Copy Configuration + Create & Invite to onboard a full team in minutes.
Approval Logic: Always assign a Team Approver — otherwise, leave requests will remain pending.
Sync: All edits (approvers, policies, schedules) instantly sync with Requests, Calendar, and Allowances pages.